> ## Documentation Index
> Fetch the complete documentation index at: https://docs.sevalla.com/llms.txt
> Use this file to discover all available pages before exploring further.
> ## Agent Instructions
> These are the docs for Sevalla, a platform for deploying applications, databases, static sites, object storage and load balancers. The dashboard is at https://app.sevalla.com.
> Bold text in steps is an exact dashboard label.
> To act on a Sevalla account, prefer the Sevalla MCP server (https://mcp.sevalla.com/mcp, see https://docs.sevalla.com/ai-agents/overview.md), then the Sevalla CLI (https://docs.sevalla.com/developer-tools/cli.md), then the REST API (https://api-docs.sevalla.com, OpenAPI spec at https://api.sevalla.com/v3/openapi.json).
> Every page index is at https://docs.sevalla.com/llms.txt.
# Okta
> Set up SAML single sign-on between Okta and Sevalla: create a SAML 2.0 app integration in Okta with Sevalla's values, then copy Okta's sign-on URL, issuer and certificate back.
Okta is an identity provider (IdP) you can connect to Sevalla with SAML single sign-on (SSO). You create a SAML 2.0 app integration in Okta with the values Sevalla shows, then paste Okta's values into Sevalla. For how SSO works in Sevalla, see [Single sign-on](/company/single-sign-on/overview).
## Before you begin
* You're a company owner or admin in Sevalla.
* You can create app integrations in the Okta Admin Console.
* Your Sevalla account uses an email address on your company's domain, and you have an Okta user with the same address. The setup test signs you in with it.
## Values to copy
From Sevalla's **Create SAML app** step into Okta:
| Okta field | Sevalla value |
| - | - |
| **App name** | `Sevalla` (**App name**) |
| **App logo** | The Sevalla logo (**App icon** > **Download**) |
| **Single sign-on URL** | `https://my.kinsta.com/saml/receive` (**SSO/ACS URL**) |
| **Audience URI (SP Entity ID)** | `https://my.kinsta.com/saml` (**Entity ID**) |
| **Name ID format** | **EmailAddress** |
| **Application username** | **Email** |
From Okta's SAML setup instructions into Sevalla's **Sevalla setup** step:
| Sevalla field | Okta value |
| - | - |
| **SSO URL** | **Identity Provider Single Sign-On URL** |
| **Entity ID** | **Identity Provider Issuer** |
| **Public certificate** | **X.509 Certificate** |
## Start the setup in Sevalla
In the sidebar, under **Company**, click **Single sign-on**. On the **Single sign-on** card, click **Enable** (or **Continue setup**).
Click **Continue** to reach **Create SAML app**. Keep this tab open: you'll copy its values into Okta.
## Create the SAML app in Okta
In the Okta Admin Console, go to **Applications** > **Applications** and click **Create App Integration**. Select **SAML 2.0**, then click **Next**.
In **App name**, enter `Sevalla`. Optionally, upload the Sevalla logo in **App logo**. Click **Next**.
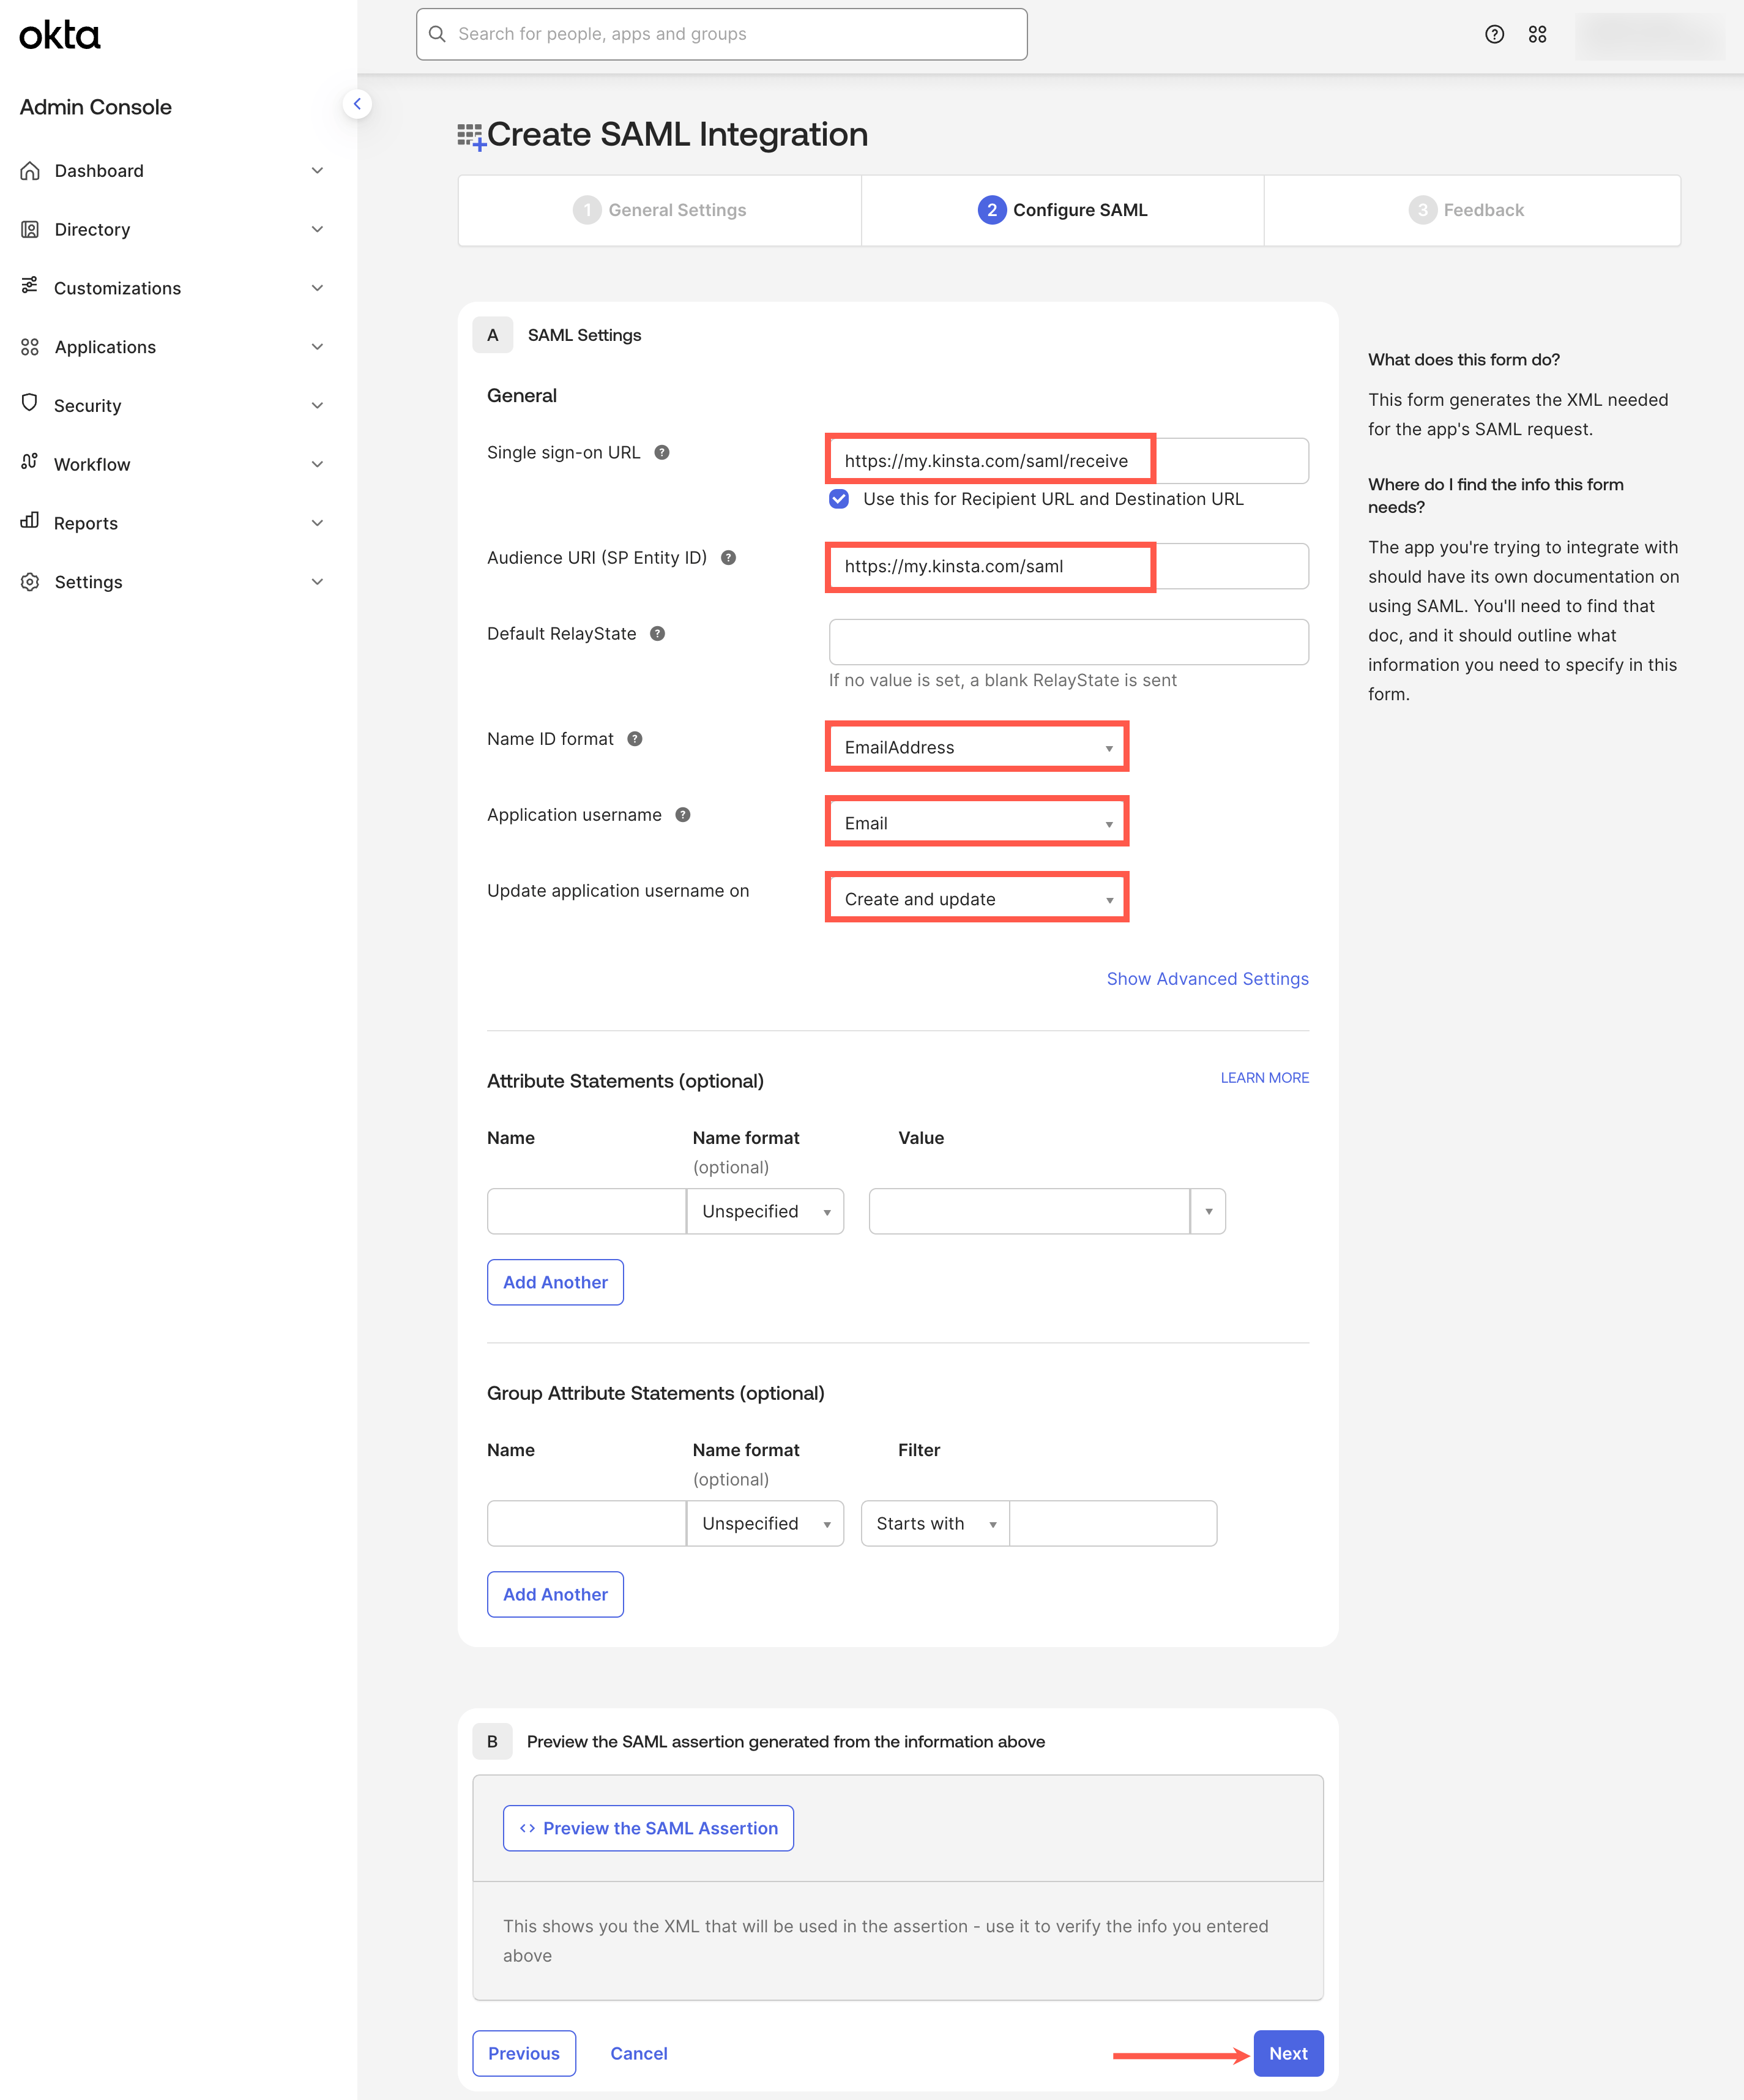
Fill in these fields and leave the others as they are:
* **Single sign-on URL**: `https://my.kinsta.com/saml/receive`. Keep **Use this for Recipient URL and Destination URL** selected.
* **Audience URI (SP Entity ID)**: `https://my.kinsta.com/saml`
* **Name ID format**: **EmailAddress**
* **Application username**: **Email**
* **Update application username on**: **Create and update**
Under **Attribute Statements**, add three statements (click **Add Another** for each new row):
| Name | Value |
| - | - |
| `firstName` | `user.firstName` |
| `lastName` | `user.lastName` |
| `email` | `user.email` |
Click **Next**.
On the **Feedback** step, say that it's an internal app you created, then click **Finish**.
 Signing in from the Okta dashboard isn't supported, so you can hide the app's icon from your users in the app's general settings.
## Give people access to the app
Only people assigned to the app can sign in to Sevalla with Okta.
In **Applications** > **Applications**, click the Sevalla app, then click the **Assignments** tab.
Click **Assign**, then **Assign to People** or **Assign to Groups**. Click **Assign** next to each person or group, then click **Done**. Include yourself, so you can run the test.
## Add the Okta details to Sevalla
In the Sevalla app in Okta, click the **Sign On** tab, then click **View SAML setup instructions**.
In the Sevalla tab, click **Continue** to reach **Sevalla setup**. Under **Email domain**, add and verify your domain. See [Verify your email domain](/company/single-sign-on/overview#verify-your-email-domain).
Under **Set up Sevalla SAML**, paste:
* **SSO URL**: Okta's **Identity Provider Single Sign-On URL**
* **Entity ID**: Okta's **Identity Provider Issuer**
* **Public certificate**: Okta's **X.509 Certificate**, including the `BEGIN CERTIFICATE` and `END CERTIFICATE` lines
Click **Continue**.
## Test and set SSO live
On **Test and finish**, click **Test authentication** and sign in to Okta. When Sevalla shows `Authentication test was successful.`, click **Save and set SSO live**. If the test fails, see [Troubleshoot SSO sign-in](/company/single-sign-on/overview#troubleshoot-sso-sign-in).
Next, you can [make SSO mandatory](/company/single-sign-on/overview#make-sso-mandatory) and [turn on just-in-time provisioning](/company/single-sign-on/overview#turn-on-just-in-time-provisioning).
## Change the session length
Okta's session settings decide how long an SSO session lasts. If Okta doesn't send a session end time, Sevalla's SSO session lasts 24 hours. To change it, see Okta's article [How to adjust session lifetime and idle value for users](https://support.okta.com/help/s/article/How-to-Adjust-Session-Lifetime-and-Idle-Value-for-Users?language=en_US).
This documentation is built and hosted on [Mintlify](https://mintlify.com), a developer documentation platform.
Signing in from the Okta dashboard isn't supported, so you can hide the app's icon from your users in the app's general settings.
## Give people access to the app
Only people assigned to the app can sign in to Sevalla with Okta.
In **Applications** > **Applications**, click the Sevalla app, then click the **Assignments** tab.
Click **Assign**, then **Assign to People** or **Assign to Groups**. Click **Assign** next to each person or group, then click **Done**. Include yourself, so you can run the test.
## Add the Okta details to Sevalla
In the Sevalla app in Okta, click the **Sign On** tab, then click **View SAML setup instructions**.
In the Sevalla tab, click **Continue** to reach **Sevalla setup**. Under **Email domain**, add and verify your domain. See [Verify your email domain](/company/single-sign-on/overview#verify-your-email-domain).
Under **Set up Sevalla SAML**, paste:
* **SSO URL**: Okta's **Identity Provider Single Sign-On URL**
* **Entity ID**: Okta's **Identity Provider Issuer**
* **Public certificate**: Okta's **X.509 Certificate**, including the `BEGIN CERTIFICATE` and `END CERTIFICATE` lines
Click **Continue**.
## Test and set SSO live
On **Test and finish**, click **Test authentication** and sign in to Okta. When Sevalla shows `Authentication test was successful.`, click **Save and set SSO live**. If the test fails, see [Troubleshoot SSO sign-in](/company/single-sign-on/overview#troubleshoot-sso-sign-in).
Next, you can [make SSO mandatory](/company/single-sign-on/overview#make-sso-mandatory) and [turn on just-in-time provisioning](/company/single-sign-on/overview#turn-on-just-in-time-provisioning).
## Change the session length
Okta's session settings decide how long an SSO session lasts. If Okta doesn't send a session end time, Sevalla's SSO session lasts 24 hours. To change it, see Okta's article [How to adjust session lifetime and idle value for users](https://support.okta.com/help/s/article/How-to-Adjust-Session-Lifetime-and-Idle-Value-for-Users?language=en_US).
This documentation is built and hosted on [Mintlify](https://mintlify.com), a developer documentation platform.