> ## Documentation Index
> Fetch the complete documentation index at: https://docs.sevalla.com/llms.txt
> Use this file to discover all available pages before exploring further.
> ## Agent Instructions
> These are the docs for Sevalla, a platform for deploying applications, databases, static sites, object storage and load balancers. The dashboard is at https://app.sevalla.com.
> Bold text in steps is an exact dashboard label.
> To act on a Sevalla account, prefer the Sevalla MCP server (https://mcp.sevalla.com/mcp, see https://docs.sevalla.com/ai-agents/overview.md), then the Sevalla CLI (https://docs.sevalla.com/developer-tools/cli.md), then the REST API (https://api-docs.sevalla.com, OpenAPI spec at https://api.sevalla.com/v3/openapi.json).
> Every page index is at https://docs.sevalla.com/llms.txt.
# Custom domains
> Serve an application, static site or load balancer on your own domain: add it, verify it with DNS records, point it, and manage SSL, wildcards, the primary domain and Sevalla domains.
A custom domain is a domain you own, such as `shop.example.com`, that serves one of your applications, static sites or load balancers over HTTPS. You add it on the service's **Domains** tab, prove you own it with DNS records, then point it at Sevalla, and Sevalla issues and renews its SSL certificate. Every service also gets a free Sevalla domain, such as `storefront-x7k2m.sevalla.app`, that works from the start.
## How custom domains work
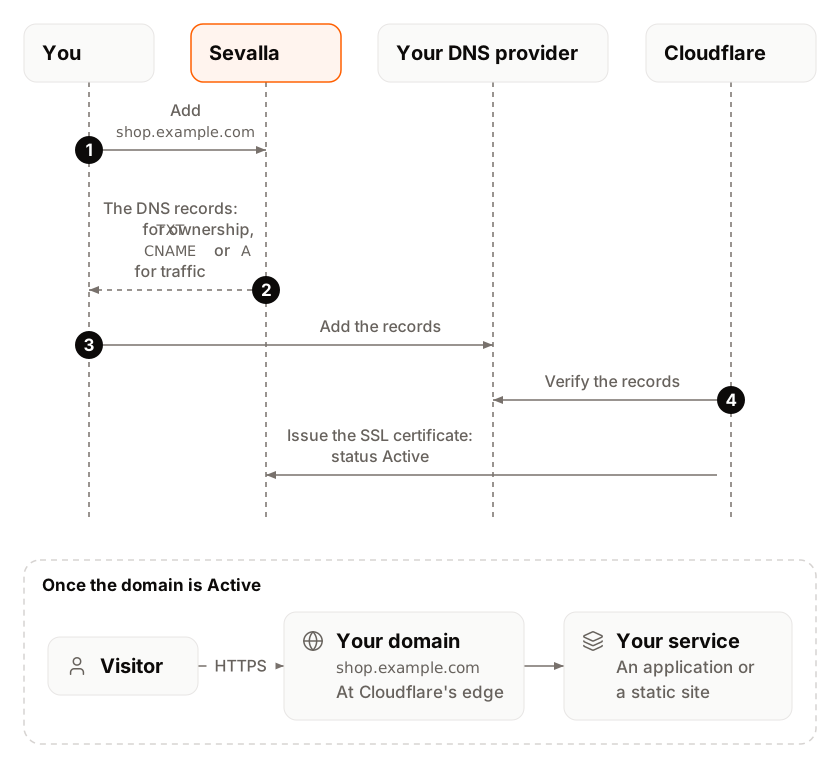
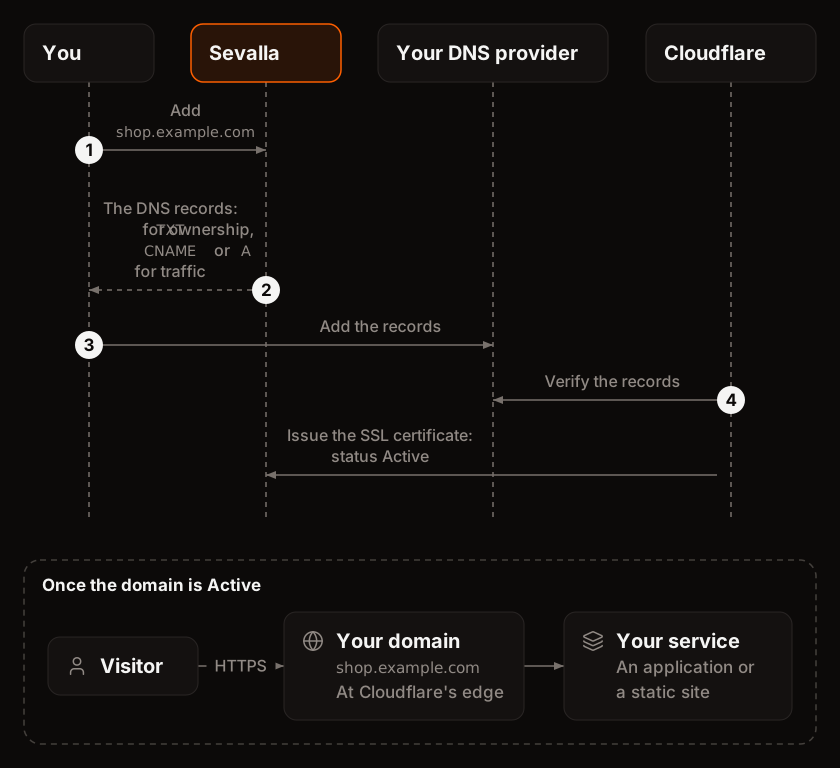
Sevalla serves every domain through Cloudflare, in front of your service, using Cloudflare for SaaS custom hostnames. A custom domain goes through three steps, shown in the **DNS records** sheet as **Add domain**, **Verify domain** and **Point domain**:
 | Status | What it means | What you do |
| - | - | - |
| **Verification** | Sevalla waits for the ownership and SSL validation records. | Add the [verification records](#verify-the-domain). |
| **Pointing** | The domain is verified and its certificate is issued. Sevalla waits for the domain to point at it. | Add the [pointing record](#point-the-domain). |
| **Active** | The domain serves the service over HTTPS. A shield icon (**SSL active**) shows next to it. | Nothing. |
| **Timed out** | Verification didn't finish in time. Final. | Delete the domain and add it again. See [Troubleshoot custom domains](/domains/troubleshooting#verification-timed-out). |
| **Disabled** | A Sevalla domain you turned off. | Enable it to serve the service again. |
Sevalla checks a domain in **Verification** or **Pointing** every 30 minutes for 7 days after you add it, and every 10 seconds while its **DNS records** sheet is open. A domain still in **Verification** after 7 days becomes **Timed out**. In the API, the statuses are `VERIFICATION`, `POINTING`, `ACTIVE` and `TIMED_OUT`.
## Sevalla domains and differences between services
Every application, static site and load balancer gets a Sevalla domain when you create it, listed under **Sevalla domains** on its **Domains** tab. It's the service's primary domain until you [make another one primary](#set-the-primary-domain), and it's covered by Sevalla's own certificate.
| | Applications | Static sites | Load balancers |
| - | - | - | - |
| Sevalla domain | `.sevalla.app` | `.sevalla.page` | `.sevalla.net` |
| Where to manage domains | **Domains** tab | **Domains** tab | **Domains** tab |
| Custom domains need | A web process on a size larger than **H1** (the Hobby size), and a payment method or credits | Nothing more | Nothing more |
| Where the primary domain shows | Header address, pipeline cards | Header address, **Visit site** | Header address, traffic diagram, list |
| When you delete the service | Its domains are deleted, custom ones included | Its domains are deleted, custom ones included | Its domains are deleted, custom ones included |
`` is the service's generated name, like `storefront-x7k2m`. Services created long ago can still have a `kinsta.app` or `kinsta.page` domain, which works the same way.
[Object storage](/object-storage/overview) buckets are different: a bucket with public access gets a `.sevalla.storage` domain and can't have custom domains.
An application's web process on the **H1** size (the Hobby size) can't have custom domains: the **Custom domains** card says `Custom domains aren’t available on the Hobby size. Move the web process to a larger size to add one.`, with a **Modify process** button. The other way round, Sevalla refuses to move a web process to the Hobby size while the application has a custom domain. See [Scaling](/applications/scaling).
## Before you begin
* Access to the DNS settings of the domain, at your registrar or DNS provider.
* Permission to update the service. People who can only view it can open a domain's DNS records but not change anything.
* For an application, a web process on a size larger than **H1**, and a payment method or credits. Without them, **Add custom domain** is disabled with `Add a payment method or credits to add custom domains.`
## Add a domain
In the sidebar, click **Applications**, **Static sites** or **Load balancers**, then click the service. Click the **Domains** tab.
Under **Custom domains**, click **Add custom domain**.
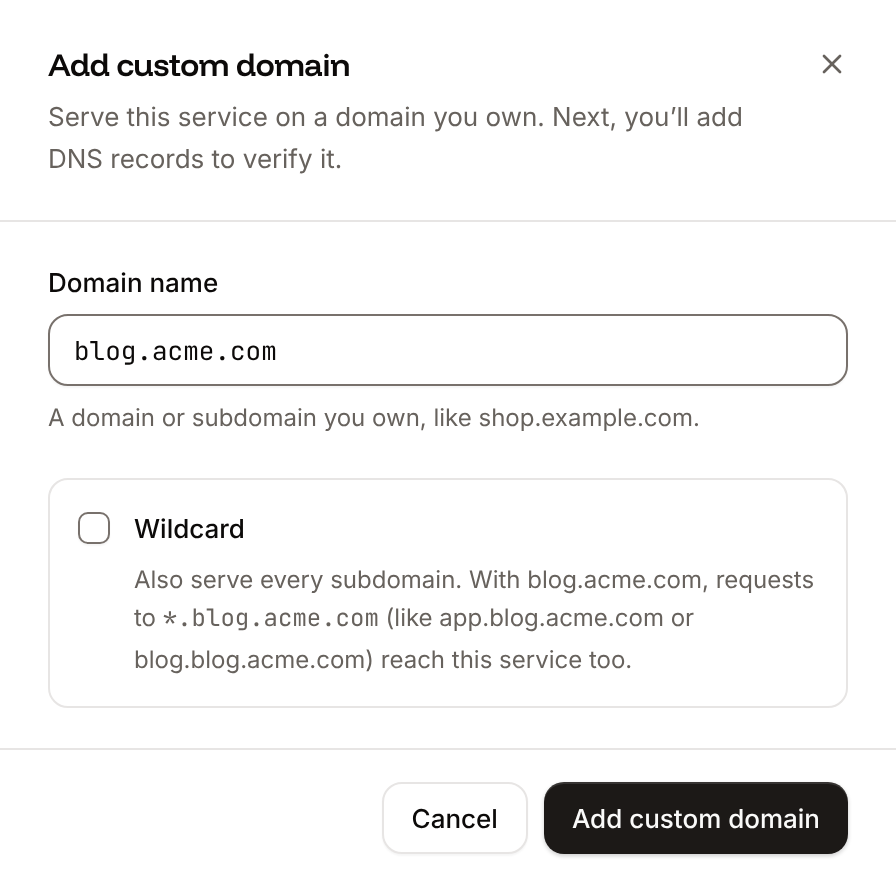
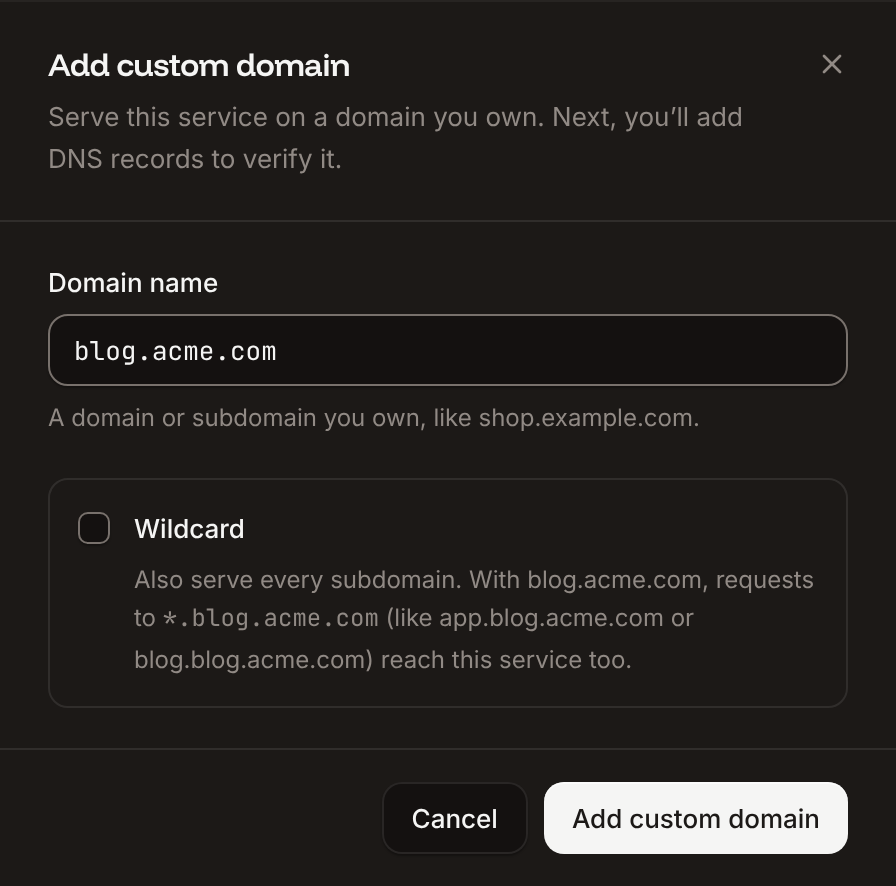
In **Domain name**, enter the domain or subdomain, such as `shop.example.com` or `example.com`. Sevalla removes `https://`, paths and uppercase letters for you.
Select **Wildcard** to also serve every subdomain of it. See [Wildcard domains](#wildcard-domains).
Click **Add custom domain**.
| Status | What it means | What you do |
| - | - | - |
| **Verification** | Sevalla waits for the ownership and SSL validation records. | Add the [verification records](#verify-the-domain). |
| **Pointing** | The domain is verified and its certificate is issued. Sevalla waits for the domain to point at it. | Add the [pointing record](#point-the-domain). |
| **Active** | The domain serves the service over HTTPS. A shield icon (**SSL active**) shows next to it. | Nothing. |
| **Timed out** | Verification didn't finish in time. Final. | Delete the domain and add it again. See [Troubleshoot custom domains](/domains/troubleshooting#verification-timed-out). |
| **Disabled** | A Sevalla domain you turned off. | Enable it to serve the service again. |
Sevalla checks a domain in **Verification** or **Pointing** every 30 minutes for 7 days after you add it, and every 10 seconds while its **DNS records** sheet is open. A domain still in **Verification** after 7 days becomes **Timed out**. In the API, the statuses are `VERIFICATION`, `POINTING`, `ACTIVE` and `TIMED_OUT`.
## Sevalla domains and differences between services
Every application, static site and load balancer gets a Sevalla domain when you create it, listed under **Sevalla domains** on its **Domains** tab. It's the service's primary domain until you [make another one primary](#set-the-primary-domain), and it's covered by Sevalla's own certificate.
| | Applications | Static sites | Load balancers |
| - | - | - | - |
| Sevalla domain | `.sevalla.app` | `.sevalla.page` | `.sevalla.net` |
| Where to manage domains | **Domains** tab | **Domains** tab | **Domains** tab |
| Custom domains need | A web process on a size larger than **H1** (the Hobby size), and a payment method or credits | Nothing more | Nothing more |
| Where the primary domain shows | Header address, pipeline cards | Header address, **Visit site** | Header address, traffic diagram, list |
| When you delete the service | Its domains are deleted, custom ones included | Its domains are deleted, custom ones included | Its domains are deleted, custom ones included |
`` is the service's generated name, like `storefront-x7k2m`. Services created long ago can still have a `kinsta.app` or `kinsta.page` domain, which works the same way.
[Object storage](/object-storage/overview) buckets are different: a bucket with public access gets a `.sevalla.storage` domain and can't have custom domains.
An application's web process on the **H1** size (the Hobby size) can't have custom domains: the **Custom domains** card says `Custom domains aren’t available on the Hobby size. Move the web process to a larger size to add one.`, with a **Modify process** button. The other way round, Sevalla refuses to move a web process to the Hobby size while the application has a custom domain. See [Scaling](/applications/scaling).
## Before you begin
* Access to the DNS settings of the domain, at your registrar or DNS provider.
* Permission to update the service. People who can only view it can open a domain's DNS records but not change anything.
* For an application, a web process on a size larger than **H1**, and a payment method or credits. Without them, **Add custom domain** is disabled with `Add a payment method or credits to add custom domains.`
## Add a domain
In the sidebar, click **Applications**, **Static sites** or **Load balancers**, then click the service. Click the **Domains** tab.
Under **Custom domains**, click **Add custom domain**.
In **Domain name**, enter the domain or subdomain, such as `shop.example.com` or `example.com`. Sevalla removes `https://`, paths and uppercase letters for you.
Select **Wildcard** to also serve every subdomain of it. See [Wildcard domains](#wildcard-domains).
Click **Add custom domain**.
 The domain appears under **Custom domains** with the status **Verification**, and its **DNS records** sheet opens. Reopen it later with **Show DNS records** next to the status, or from the domain's ⋯ menu.
| Rule | Message |
| - | - |
| A valid public hostname, with a dot and a known top-level domain. No `*.` prefix (select **Wildcard** instead), no `localhost`. | `Invalid domain name` |
| Not a `.ru` domain, for applications, static sites and load balancers alike. See [Acceptable use](/security/acceptable-use#restricted-countries). | `.ru domain names are not supported` |
| Not already added to any Sevalla service, in any company | `Domain already exists` |
## Verify the domain
The **Verify domain** step lists two records that prove you control the domain and let the certificate authority issue its certificate. Each **Name** shows twice: the full name and the short one. Some DNS providers, such as Namecheap and Squarespace, add your domain to the name for you; use the short one there.
| Record | Type | Name | Value | Keep it? |
| - | - | - | - | - |
| Ownership | `TXT` | `_cf-custom-hostname.shop.example.com` | The value shown, unique to the domain | You can remove it once the domain is **Active** |
| SSL validation | `TXT`, or `CNAME` for a wildcard domain | `_acme-challenge.shop.example.com` | The token shown (`TXT`), or a target ending in `dcv.cloudflare.com` (`CNAME`) | Yes, for certificate renewals |
Sign in where your domain's DNS is managed and open its DNS records.
Delete any existing `A` or `CNAME` record on the domain you're adding, and old `_cf-custom-hostname` or `_acme-challenge` records from an earlier attempt.
Add each record with the exact type, name and value from the sheet. Copy them with the copy buttons. Leave the TTL on Auto or a few minutes.
Keep the **DNS records** sheet open, or click **Refresh records**.
The domain appears under **Custom domains** with the status **Verification**, and its **DNS records** sheet opens. Reopen it later with **Show DNS records** next to the status, or from the domain's ⋯ menu.
| Rule | Message |
| - | - |
| A valid public hostname, with a dot and a known top-level domain. No `*.` prefix (select **Wildcard** instead), no `localhost`. | `Invalid domain name` |
| Not a `.ru` domain, for applications, static sites and load balancers alike. See [Acceptable use](/security/acceptable-use#restricted-countries). | `.ru domain names are not supported` |
| Not already added to any Sevalla service, in any company | `Domain already exists` |
## Verify the domain
The **Verify domain** step lists two records that prove you control the domain and let the certificate authority issue its certificate. Each **Name** shows twice: the full name and the short one. Some DNS providers, such as Namecheap and Squarespace, add your domain to the name for you; use the short one there.
| Record | Type | Name | Value | Keep it? |
| - | - | - | - | - |
| Ownership | `TXT` | `_cf-custom-hostname.shop.example.com` | The value shown, unique to the domain | You can remove it once the domain is **Active** |
| SSL validation | `TXT`, or `CNAME` for a wildcard domain | `_acme-challenge.shop.example.com` | The token shown (`TXT`), or a target ending in `dcv.cloudflare.com` (`CNAME`) | Yes, for certificate renewals |
Sign in where your domain's DNS is managed and open its DNS records.
Delete any existing `A` or `CNAME` record on the domain you're adding, and old `_cf-custom-hostname` or `_acme-challenge` records from an earlier attempt.
Add each record with the exact type, name and value from the sheet. Copy them with the copy buttons. Leave the TTL on Auto or a few minutes.
Keep the **DNS records** sheet open, or click **Refresh records**.
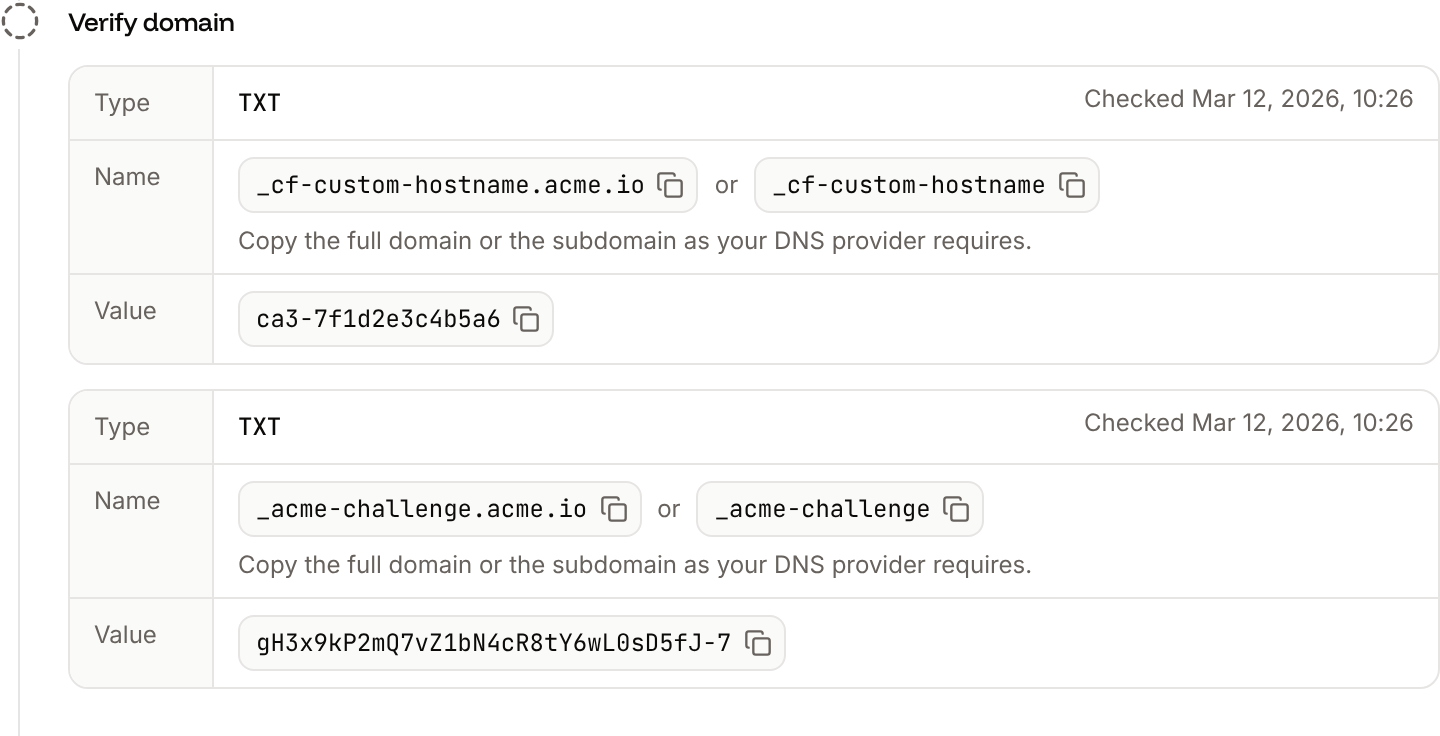
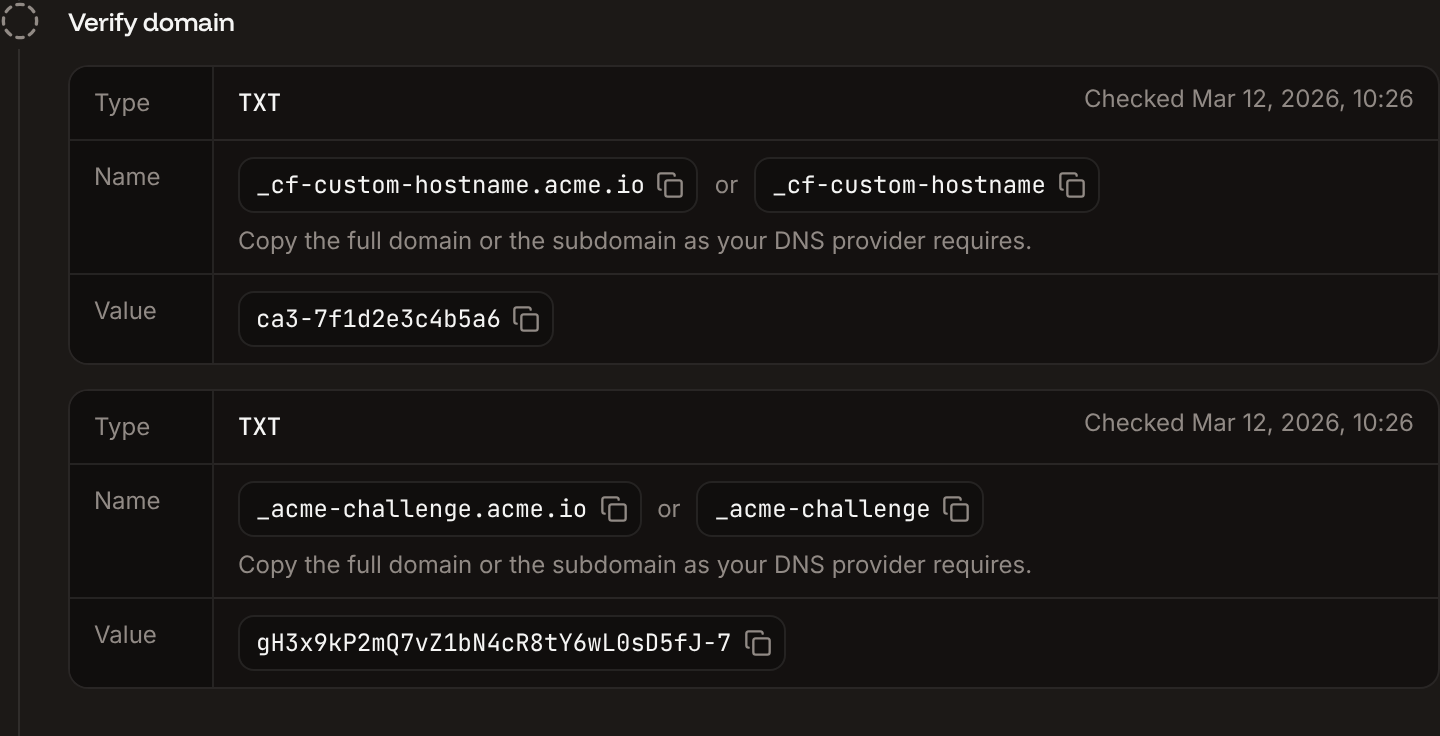 Verification usually completes within minutes, and can take hours with some DNS providers. When it does, both records show **Verified**, the status changes to **Pointing**, and the **Point domain** records appear. If the last check found problems, the sheet lists them under `The last check found problems`. If your domain's DNS is on Cloudflare, the verification record is the pointing record instead: see [Domains on Cloudflare DNS](#domains-on-cloudflare-dns).
## Point the domain
The **Point domain** step shows the record that sends the domain's traffic to Sevalla. Its type depends on where your DNS is:
| Your DNS | Type | Name | Value |
| - | - | - | - |
| Any provider but Cloudflare | `A` | The domain, for example `shop.example.com` | The IP address shown |
| Cloudflare | `CNAME` | The domain | The target shown, such as `to.sevalla.app` |
A wildcard domain gets a second record of the same type for `*.` the domain, such as `*.example.com`.
At your DNS provider, add the record from the **Point domain** step. If the domain already has `A`, `AAAA` or `CNAME` records pointing elsewhere, delete them: every `A` record of the domain must point at Sevalla.
Keep the sheet open, or click **Refresh records**.
When Sevalla sees the record, the status changes to **Active**, the shield icon appears, and `https://shop.example.com` serves the service. For applications and static sites, Sevalla redirects `http://` requests to `https://` with a `301`. Open the domain in a private window to check.
## Root domains and subdomains
Each hostname is its own domain in Sevalla, with its own records, and Sevalla doesn't redirect one to another.
| You want | Add |
| - | - |
| `example.com` and `www.example.com` | Both, as two domains, or `example.com` with **Wildcard**, which also covers `www` and every other subdomain |
| Only `shop.example.com` | `shop.example.com` |
| Every subdomain of `example.com` | `example.com` with **Wildcard** |
For a root domain such as `example.com`, use the `A` record from the **Point domain** step: most DNS providers don't allow a `CNAME` record on the root. To send visitors from one hostname to the other, redirect in your application, or use [redirects](/static-sites/redirects) on a static site.
## Wildcard domains
A wildcard domain serves the domain and every subdomain of it with one certificate: `example.com` with **Wildcard** also serves `app.example.com`, `blog.example.com` and any other subdomain. You choose it when you add the domain; to change it, delete the domain and add it again.
A wildcard domain needs three records: the ownership `TXT` record, an `_acme-challenge` **`CNAME`** record (not `TXT`) that lets the certificate renew, and the pointing record for both the domain and `*.` the domain. An application gets the requested hostname in the `Host` header, so it can tell subdomains apart. The **Custom domains** list shows a **Wildcard** badge on it.
## Domains on Cloudflare DNS
If your domain's nameservers are Cloudflare's, Sevalla detects it and changes the records:
* The **Verify domain** step asks for the `CNAME` pointing record instead of the ownership `TXT` record. The `_acme-challenge` record stays.
* The **Point domain** step uses a `CNAME` record, which Cloudflare also accepts on the root domain.
Set the `CNAME` record to **DNS only** (grey cloud) until the domain is **Active**: a proxied record hides its target, so verification can't complete. Once it's active, you can turn the proxy back on (orange cloud). Your traffic then passes through your Cloudflare zone and Sevalla's, which has two consequences:
* Your zone's cache sits in front of Sevalla's [CDN and edge caching](/applications/caching), and purging Sevalla's cache doesn't purge yours. Purge both when you troubleshoot stale content.
* Your zone's SSL/TLS mode must be **Full** or **Full (strict)**. With **Flexible**, your zone connects to Sevalla over HTTP, Sevalla redirects to HTTPS, and visitors get a redirect loop.
For most setups, leave the record on **DNS only** and use Sevalla's own caching.
## SSL certificates
Sevalla issues a certificate for every custom domain once it's verified, and renews it automatically while the `_acme-challenge` record is in place. You don't upload or renew anything.
| Detail | Value |
| - | - |
| Certificate authority | Google Trust Services. Let's Encrypt for internationalized domain names (with non-ASCII characters). |
| Validation | DNS: the `_acme-challenge` `TXT` record, or a `CNAME` delegated to Cloudflare for wildcard domains |
| Minimum TLS version | TLS 1.2 |
| Cost | Free |
If your domain has `CAA` records, they must allow the certificate authority: add `CAA 0 issue "pki.goog"` (and `CAA 0 issue "letsencrypt.org"` for an internationalized domain), or remove the `CAA` records. Otherwise the certificate isn't issued and the domain stays in **Verification**.
To use your own certificate, add the domain with the API and send `custom_ssl_cert` and `custom_ssl_key` (PEM) with it: see [Add application domain](https://api-docs.sevalla.com/v3/applications/add-application-domain). The dashboard doesn't take certificates.
## Set the primary domain
The primary domain is the address Sevalla shows and links to for the service. It doesn't redirect your other domains: all of them keep serving the service. Only one domain is primary, and only an enabled domain with the status **Active** can become primary. A new custom domain doesn't become primary on its own.
On the service's **Domains** tab, open the ⋯ menu of the domain.
Click **Make primary domain**, then click **Set as primary** in the **Set primary domain** dialog.
Verification usually completes within minutes, and can take hours with some DNS providers. When it does, both records show **Verified**, the status changes to **Pointing**, and the **Point domain** records appear. If the last check found problems, the sheet lists them under `The last check found problems`. If your domain's DNS is on Cloudflare, the verification record is the pointing record instead: see [Domains on Cloudflare DNS](#domains-on-cloudflare-dns).
## Point the domain
The **Point domain** step shows the record that sends the domain's traffic to Sevalla. Its type depends on where your DNS is:
| Your DNS | Type | Name | Value |
| - | - | - | - |
| Any provider but Cloudflare | `A` | The domain, for example `shop.example.com` | The IP address shown |
| Cloudflare | `CNAME` | The domain | The target shown, such as `to.sevalla.app` |
A wildcard domain gets a second record of the same type for `*.` the domain, such as `*.example.com`.
At your DNS provider, add the record from the **Point domain** step. If the domain already has `A`, `AAAA` or `CNAME` records pointing elsewhere, delete them: every `A` record of the domain must point at Sevalla.
Keep the sheet open, or click **Refresh records**.
When Sevalla sees the record, the status changes to **Active**, the shield icon appears, and `https://shop.example.com` serves the service. For applications and static sites, Sevalla redirects `http://` requests to `https://` with a `301`. Open the domain in a private window to check.
## Root domains and subdomains
Each hostname is its own domain in Sevalla, with its own records, and Sevalla doesn't redirect one to another.
| You want | Add |
| - | - |
| `example.com` and `www.example.com` | Both, as two domains, or `example.com` with **Wildcard**, which also covers `www` and every other subdomain |
| Only `shop.example.com` | `shop.example.com` |
| Every subdomain of `example.com` | `example.com` with **Wildcard** |
For a root domain such as `example.com`, use the `A` record from the **Point domain** step: most DNS providers don't allow a `CNAME` record on the root. To send visitors from one hostname to the other, redirect in your application, or use [redirects](/static-sites/redirects) on a static site.
## Wildcard domains
A wildcard domain serves the domain and every subdomain of it with one certificate: `example.com` with **Wildcard** also serves `app.example.com`, `blog.example.com` and any other subdomain. You choose it when you add the domain; to change it, delete the domain and add it again.
A wildcard domain needs three records: the ownership `TXT` record, an `_acme-challenge` **`CNAME`** record (not `TXT`) that lets the certificate renew, and the pointing record for both the domain and `*.` the domain. An application gets the requested hostname in the `Host` header, so it can tell subdomains apart. The **Custom domains** list shows a **Wildcard** badge on it.
## Domains on Cloudflare DNS
If your domain's nameservers are Cloudflare's, Sevalla detects it and changes the records:
* The **Verify domain** step asks for the `CNAME` pointing record instead of the ownership `TXT` record. The `_acme-challenge` record stays.
* The **Point domain** step uses a `CNAME` record, which Cloudflare also accepts on the root domain.
Set the `CNAME` record to **DNS only** (grey cloud) until the domain is **Active**: a proxied record hides its target, so verification can't complete. Once it's active, you can turn the proxy back on (orange cloud). Your traffic then passes through your Cloudflare zone and Sevalla's, which has two consequences:
* Your zone's cache sits in front of Sevalla's [CDN and edge caching](/applications/caching), and purging Sevalla's cache doesn't purge yours. Purge both when you troubleshoot stale content.
* Your zone's SSL/TLS mode must be **Full** or **Full (strict)**. With **Flexible**, your zone connects to Sevalla over HTTP, Sevalla redirects to HTTPS, and visitors get a redirect loop.
For most setups, leave the record on **DNS only** and use Sevalla's own caching.
## SSL certificates
Sevalla issues a certificate for every custom domain once it's verified, and renews it automatically while the `_acme-challenge` record is in place. You don't upload or renew anything.
| Detail | Value |
| - | - |
| Certificate authority | Google Trust Services. Let's Encrypt for internationalized domain names (with non-ASCII characters). |
| Validation | DNS: the `_acme-challenge` `TXT` record, or a `CNAME` delegated to Cloudflare for wildcard domains |
| Minimum TLS version | TLS 1.2 |
| Cost | Free |
If your domain has `CAA` records, they must allow the certificate authority: add `CAA 0 issue "pki.goog"` (and `CAA 0 issue "letsencrypt.org"` for an internationalized domain), or remove the `CAA` records. Otherwise the certificate isn't issued and the domain stays in **Verification**.
To use your own certificate, add the domain with the API and send `custom_ssl_cert` and `custom_ssl_key` (PEM) with it: see [Add application domain](https://api-docs.sevalla.com/v3/applications/add-application-domain). The dashboard doesn't take certificates.
## Set the primary domain
The primary domain is the address Sevalla shows and links to for the service. It doesn't redirect your other domains: all of them keep serving the service. Only one domain is primary, and only an enabled domain with the status **Active** can become primary. A new custom domain doesn't become primary on its own.
On the service's **Domains** tab, open the ⋯ menu of the domain.
Click **Make primary domain**, then click **Set as primary** in the **Set primary domain** dialog.
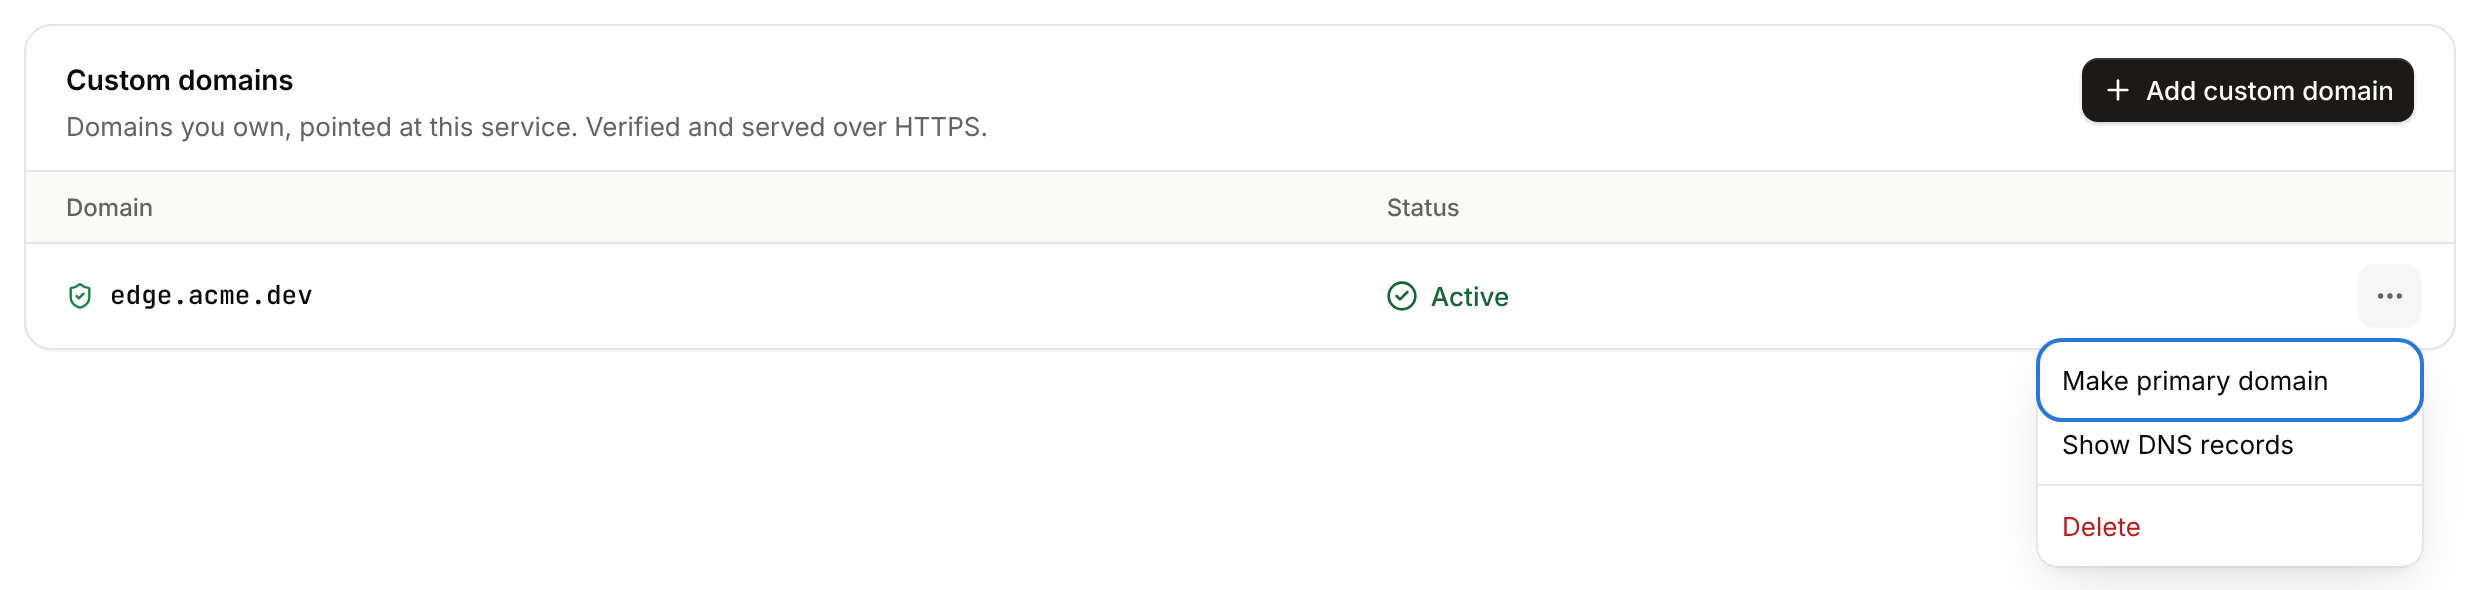
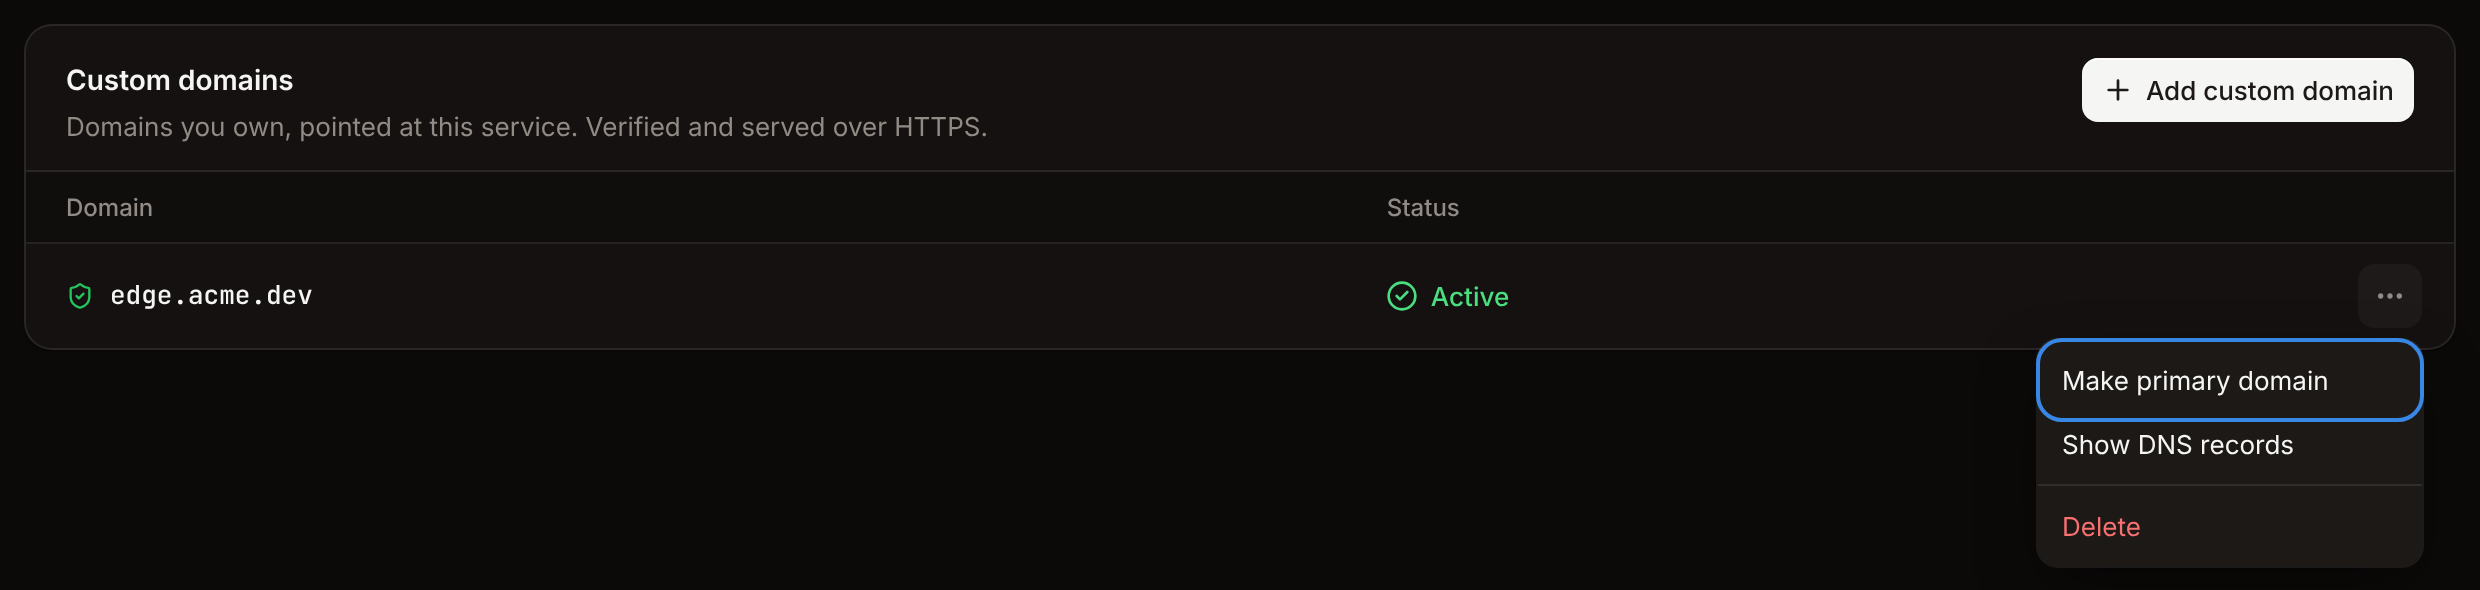 The domain gets the **Primary** badge, and the service's header shows it as its address.
## Rename a Sevalla domain
You can change the part of a Sevalla domain before `.sevalla.app`, `.sevalla.page` or `.sevalla.net`.
On the service's **Domains** tab, under **Sevalla domains**, open the domain's ⋯ menu and click **Update**.
In **Domain name**, enter 3 to 63 letters, numbers and hyphens.
Click **Update domain**.
The service answers on the new name, and the old name stops working right away. Update every link and integration that used it.
| Rule | Message |
| - | - |
| 3 to 63 characters | `Domain name must be at least 3 characters long`, `Domain name must be at most 63 characters long` |
| Letters, numbers and hyphens only | `Domain name can only contain letters, numbers, and hyphens` |
| No blocked word anywhere in the name, even inside another word: brand names such as `google` or `paypal`, adult, gambling, crypto and scam terms, and short terms such as `x`, `tor`, `ms` and `bet`. So `nextjs` and `storefront` are refused too. | `This domain name is not allowed`, or `Failed to update domain` when the word is inside another word |
| Not taken | `Domain already exists` |
Only an enabled Sevalla domain can be renamed.
## Disable a Sevalla domain
Disabling the Sevalla domain makes the service stop answering on it, for example once your custom domain is live. Make the custom domain primary first.
On the service's **Domains** tab, under **Sevalla domains**, open the domain's ⋯ menu and click **Disable**.
Click **Disable domain**.
The domain shows **Disabled**. To serve the service on it again, open its menu, click **Enable**, then **Enable domain**. Custom domains can't be disabled, only deleted.
## Delete a custom domain
On the service's **Domains** tab, open the custom domain's ⋯ menu and click **Delete**.
Click **Delete domain**.
The domain stops serving the service right away and disappears from the list. If it was the primary domain, the Sevalla domain becomes primary again. Remove its records at your DNS provider. You can add the domain again later, to this or another service; deleting and adding it again is also how a **Timed out** domain starts over.
## IP addresses
The IP address in the `A` record belongs to Cloudflare, which runs in front of every Sevalla service. It doesn't show where your service runs and doesn't add latency: your service runs in the [location](/platform/locations) you chose. Sevalla's IP addresses are shared by Sevalla customers only. We don't offer dedicated IP addresses.
## API and CLI
| Task | API | CLI |
| - | - | - |
| List a service's domains | [Applications](https://api-docs.sevalla.com/v3/applications/list-application-domains), [static sites](https://api-docs.sevalla.com/v3/static-sites/list-static-site-domains), [load balancers](https://api-docs.sevalla.com/v3/load-balancers/list-load-balancer-domains) | `sevalla apps domains list --app-id ` |
| Add a custom domain (with `is_wildcard`, or your own certificate) | [Applications](https://api-docs.sevalla.com/v3/applications/add-application-domain), [static sites](https://api-docs.sevalla.com/v3/static-sites/add-static-site-domain), [load balancers](https://api-docs.sevalla.com/v3/load-balancers/add-load-balancer-domain) | `sevalla apps domains add --name shop.example.com` |
| Get a domain, its status and DNS records | [Applications](https://api-docs.sevalla.com/v3/applications/get-application-domain), [static sites](https://api-docs.sevalla.com/v3/static-sites/get-static-site-domain), [load balancers](https://api-docs.sevalla.com/v3/load-balancers/get-load-balancer-domain) | `sevalla apps domains get --app-id ` |
| Check the DNS records again | [Applications](https://api-docs.sevalla.com/v3/applications/refresh-application-domain-status), [static sites](https://api-docs.sevalla.com/v3/static-sites/refresh-static-site-domain-status), [load balancers](https://api-docs.sevalla.com/v3/load-balancers/refresh-load-balancer-domain-status) | `sevalla apps domains refresh-status ` |
| Set the primary domain | [Applications](https://api-docs.sevalla.com/v3/applications/set-primary-application-domain), [static sites](https://api-docs.sevalla.com/v3/static-sites/set-primary-static-site-domain), [load balancers](https://api-docs.sevalla.com/v3/load-balancers/set-primary-load-balancer-domain) | `sevalla apps domains set-primary ` |
| Rename a Sevalla domain | [Applications](https://api-docs.sevalla.com/v3/applications/update-application-system-domain), [static sites](https://api-docs.sevalla.com/v3/static-sites/update-static-site-system-domain), [load balancers](https://api-docs.sevalla.com/v3/load-balancers/update-load-balancer-system-domain) | `sevalla apps domains update --app-id --name ` |
| Disable or enable a Sevalla domain | [Applications](https://api-docs.sevalla.com/v3/applications/toggle-application-system-domain), [static sites](https://api-docs.sevalla.com/v3/static-sites/toggle-static-site-system-domain), [load balancers](https://api-docs.sevalla.com/v3/load-balancers/toggle-load-balancer-system-domain) | `sevalla apps domains toggle ` |
| Delete a custom domain | [Applications](https://api-docs.sevalla.com/v3/applications/delete-application-domain), [static sites](https://api-docs.sevalla.com/v3/static-sites/delete-static-site-domain), [load balancers](https://api-docs.sevalla.com/v3/load-balancers/delete-load-balancer-domain) | `sevalla apps domains delete --confirm` |
The CLI commands for static sites and load balancers are the same under `sevalla static-sites domains` (with `--site-id` or ``) and `sevalla load-balancers domains` (with `--lb-id` or ``). The CLI adds domains without the wildcard option; use the dashboard or the API for wildcard domains.
This documentation is built and hosted on [Mintlify](https://mintlify.com), a developer documentation platform.
The domain gets the **Primary** badge, and the service's header shows it as its address.
## Rename a Sevalla domain
You can change the part of a Sevalla domain before `.sevalla.app`, `.sevalla.page` or `.sevalla.net`.
On the service's **Domains** tab, under **Sevalla domains**, open the domain's ⋯ menu and click **Update**.
In **Domain name**, enter 3 to 63 letters, numbers and hyphens.
Click **Update domain**.
The service answers on the new name, and the old name stops working right away. Update every link and integration that used it.
| Rule | Message |
| - | - |
| 3 to 63 characters | `Domain name must be at least 3 characters long`, `Domain name must be at most 63 characters long` |
| Letters, numbers and hyphens only | `Domain name can only contain letters, numbers, and hyphens` |
| No blocked word anywhere in the name, even inside another word: brand names such as `google` or `paypal`, adult, gambling, crypto and scam terms, and short terms such as `x`, `tor`, `ms` and `bet`. So `nextjs` and `storefront` are refused too. | `This domain name is not allowed`, or `Failed to update domain` when the word is inside another word |
| Not taken | `Domain already exists` |
Only an enabled Sevalla domain can be renamed.
## Disable a Sevalla domain
Disabling the Sevalla domain makes the service stop answering on it, for example once your custom domain is live. Make the custom domain primary first.
On the service's **Domains** tab, under **Sevalla domains**, open the domain's ⋯ menu and click **Disable**.
Click **Disable domain**.
The domain shows **Disabled**. To serve the service on it again, open its menu, click **Enable**, then **Enable domain**. Custom domains can't be disabled, only deleted.
## Delete a custom domain
On the service's **Domains** tab, open the custom domain's ⋯ menu and click **Delete**.
Click **Delete domain**.
The domain stops serving the service right away and disappears from the list. If it was the primary domain, the Sevalla domain becomes primary again. Remove its records at your DNS provider. You can add the domain again later, to this or another service; deleting and adding it again is also how a **Timed out** domain starts over.
## IP addresses
The IP address in the `A` record belongs to Cloudflare, which runs in front of every Sevalla service. It doesn't show where your service runs and doesn't add latency: your service runs in the [location](/platform/locations) you chose. Sevalla's IP addresses are shared by Sevalla customers only. We don't offer dedicated IP addresses.
## API and CLI
| Task | API | CLI |
| - | - | - |
| List a service's domains | [Applications](https://api-docs.sevalla.com/v3/applications/list-application-domains), [static sites](https://api-docs.sevalla.com/v3/static-sites/list-static-site-domains), [load balancers](https://api-docs.sevalla.com/v3/load-balancers/list-load-balancer-domains) | `sevalla apps domains list --app-id ` |
| Add a custom domain (with `is_wildcard`, or your own certificate) | [Applications](https://api-docs.sevalla.com/v3/applications/add-application-domain), [static sites](https://api-docs.sevalla.com/v3/static-sites/add-static-site-domain), [load balancers](https://api-docs.sevalla.com/v3/load-balancers/add-load-balancer-domain) | `sevalla apps domains add --name shop.example.com` |
| Get a domain, its status and DNS records | [Applications](https://api-docs.sevalla.com/v3/applications/get-application-domain), [static sites](https://api-docs.sevalla.com/v3/static-sites/get-static-site-domain), [load balancers](https://api-docs.sevalla.com/v3/load-balancers/get-load-balancer-domain) | `sevalla apps domains get --app-id ` |
| Check the DNS records again | [Applications](https://api-docs.sevalla.com/v3/applications/refresh-application-domain-status), [static sites](https://api-docs.sevalla.com/v3/static-sites/refresh-static-site-domain-status), [load balancers](https://api-docs.sevalla.com/v3/load-balancers/refresh-load-balancer-domain-status) | `sevalla apps domains refresh-status ` |
| Set the primary domain | [Applications](https://api-docs.sevalla.com/v3/applications/set-primary-application-domain), [static sites](https://api-docs.sevalla.com/v3/static-sites/set-primary-static-site-domain), [load balancers](https://api-docs.sevalla.com/v3/load-balancers/set-primary-load-balancer-domain) | `sevalla apps domains set-primary ` |
| Rename a Sevalla domain | [Applications](https://api-docs.sevalla.com/v3/applications/update-application-system-domain), [static sites](https://api-docs.sevalla.com/v3/static-sites/update-static-site-system-domain), [load balancers](https://api-docs.sevalla.com/v3/load-balancers/update-load-balancer-system-domain) | `sevalla apps domains update --app-id --name ` |
| Disable or enable a Sevalla domain | [Applications](https://api-docs.sevalla.com/v3/applications/toggle-application-system-domain), [static sites](https://api-docs.sevalla.com/v3/static-sites/toggle-static-site-system-domain), [load balancers](https://api-docs.sevalla.com/v3/load-balancers/toggle-load-balancer-system-domain) | `sevalla apps domains toggle ` |
| Delete a custom domain | [Applications](https://api-docs.sevalla.com/v3/applications/delete-application-domain), [static sites](https://api-docs.sevalla.com/v3/static-sites/delete-static-site-domain), [load balancers](https://api-docs.sevalla.com/v3/load-balancers/delete-load-balancer-domain) | `sevalla apps domains delete --confirm` |
The CLI commands for static sites and load balancers are the same under `sevalla static-sites domains` (with `--site-id` or ``) and `sevalla load-balancers domains` (with `--lb-id` or ``). The CLI adds domains without the wildcard option; use the dashboard or the API for wildcard domains.
This documentation is built and hosted on [Mintlify](https://mintlify.com), a developer documentation platform.