> ## Documentation Index
> Fetch the complete documentation index at: https://docs.sevalla.com/llms.txt
> Use this file to discover all available pages before exploring further.
> ## Agent Instructions
> These are the docs for Sevalla, a platform for deploying applications, databases, static sites, object storage and load balancers. The dashboard is at https://app.sevalla.com.
> Bold text in steps is an exact dashboard label.
> To act on a Sevalla account, prefer the Sevalla MCP server (https://mcp.sevalla.com/mcp, see https://docs.sevalla.com/ai-agents/overview.md), then the Sevalla CLI (https://docs.sevalla.com/developer-tools/cli.md), then the REST API (https://api-docs.sevalla.com, OpenAPI spec at https://api.sevalla.com/v3/openapi.json).
> Every page index is at https://docs.sevalla.com/llms.txt.
# Store Django media in object storage
> Store Django uploads in a Sevalla object storage bucket with django-storages and its S3 backend, with presigned or public URLs, and optionally serve static files from it.
Django saves uploaded files (media) to the local filesystem by default, and Sevalla resets an application's filesystem on every deployment. With django-storages, Django saves them in a Sevalla [object storage](/object-storage/overview) bucket instead, through its S3-compatible API, so every instance and every deployment sees the same files.
## Before you begin
* A Django project deployed on Sevalla, as in [Deploy Django](/guides/python/django/deploy).
## Create a bucket
In the sidebar, click **Object storage**, then click **Create object storage**. Enter `storefront-media` as the **Name**, choose the **Location** closest to the application, and click **Create object storage**.
Keep the bucket private to serve each file through a link that expires. To serve files to anyone with a permanent URL, click the bucket's **Settings** tab, click **Enable public access** under **Public access**, then click **Enable public access** in the dialog.
## Add the bucket details to the application
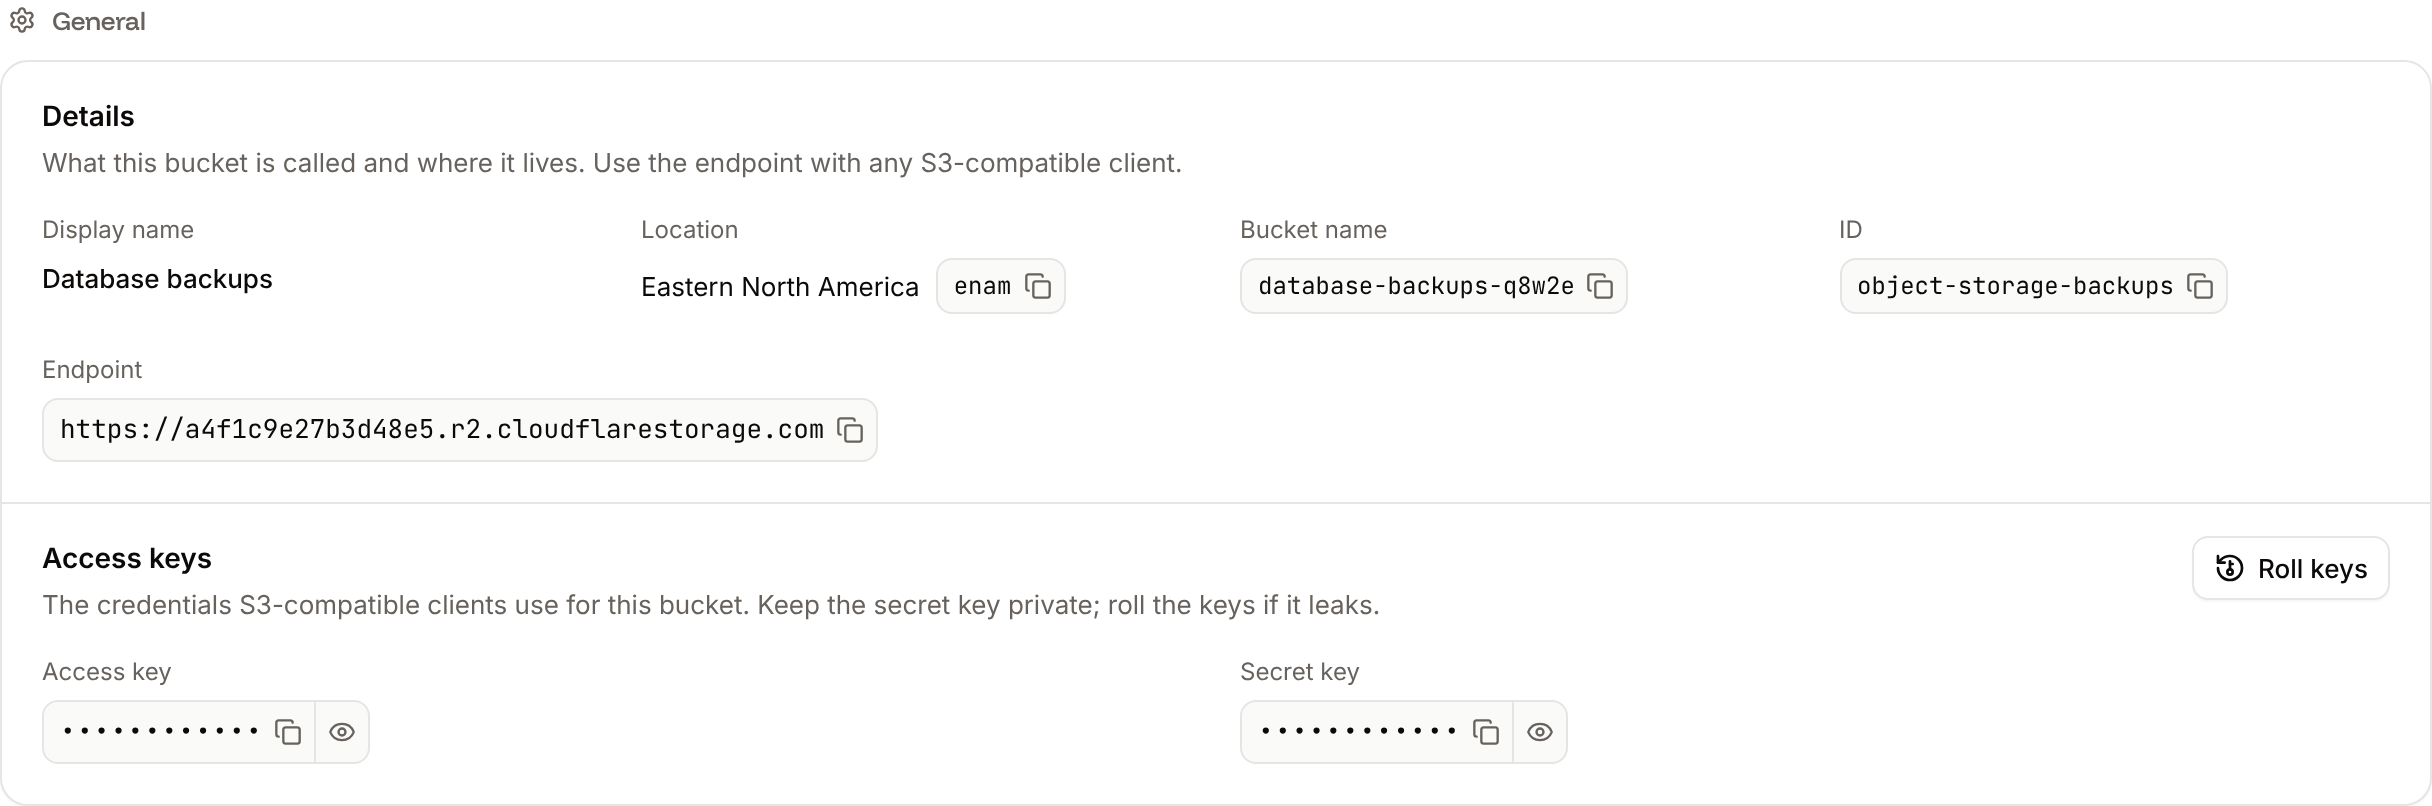
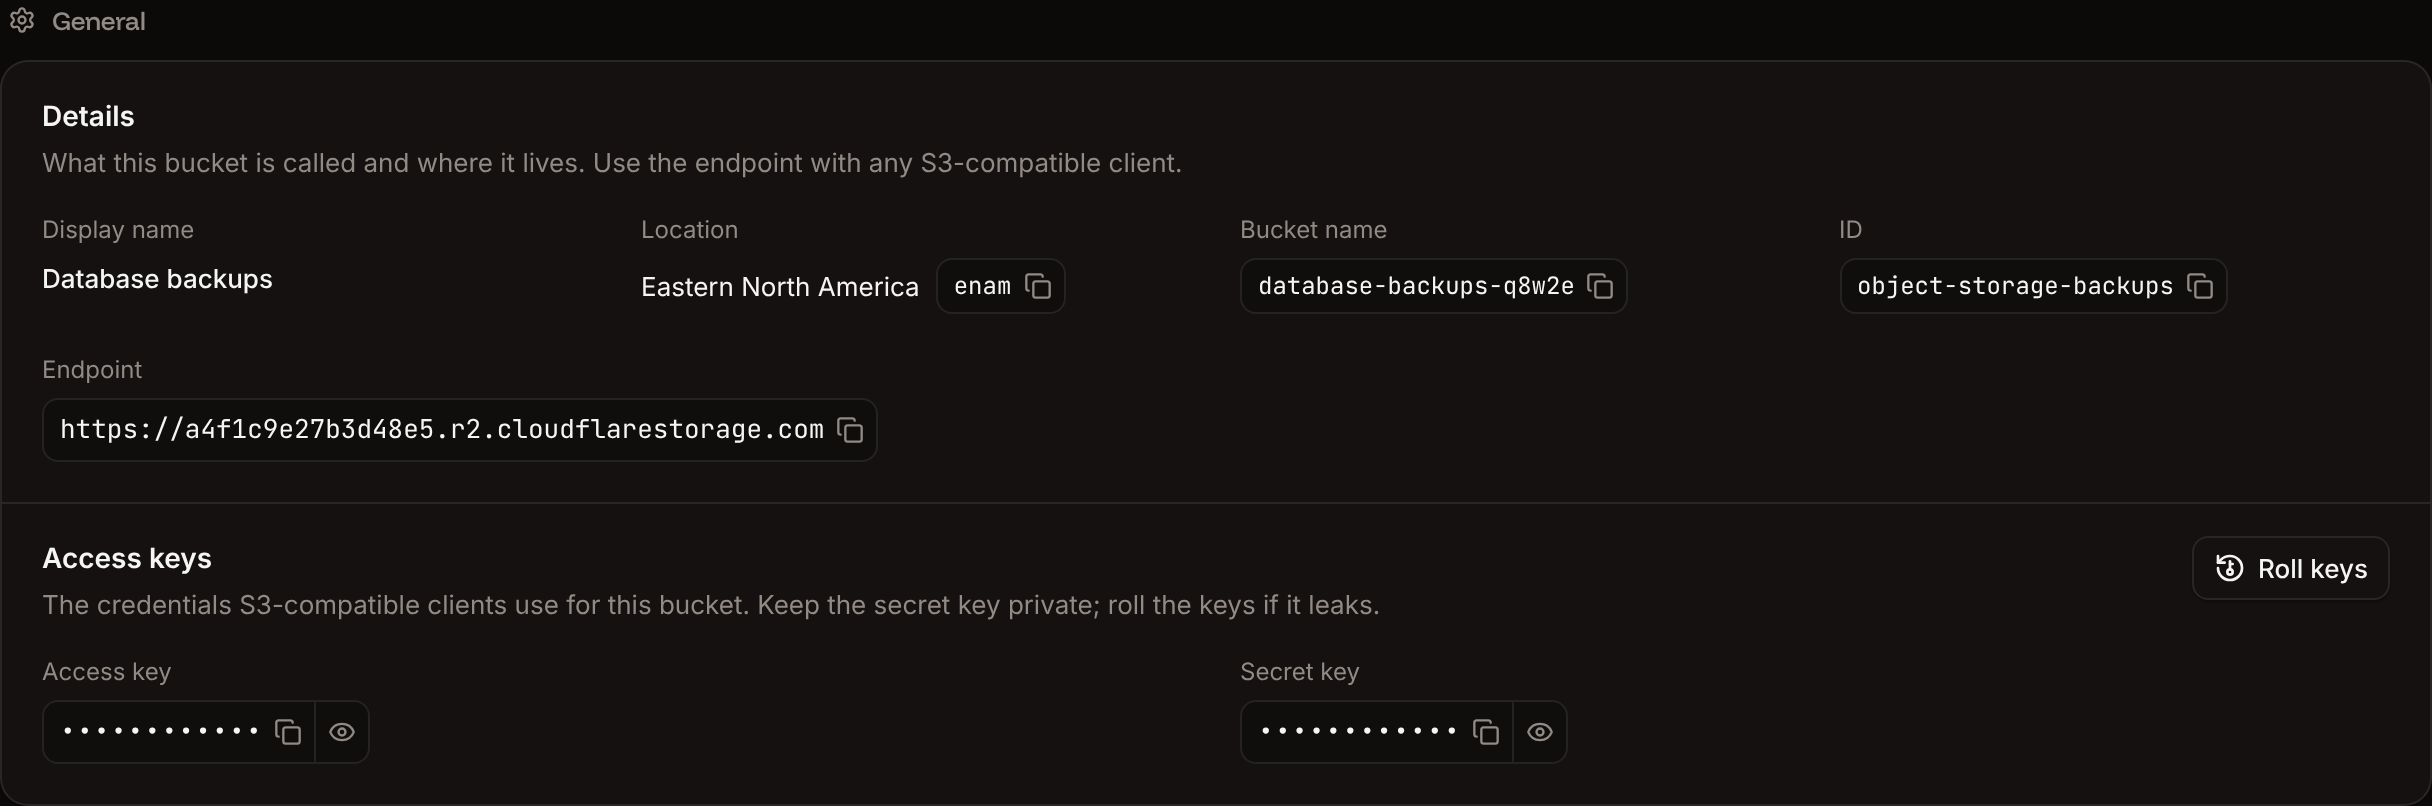
The values come from the bucket's **Settings** tab. See [Connect with the S3 API](/object-storage/connect) for each one.
| Variable | Where to find it |
| - | - |
| `S3_BUCKET` | **Bucket name** under **Details**, for example `storefront-media-q8w2e`. It's not the display name. |
| `S3_ENDPOINT` | **Endpoint** under **Details**, in the form `https://.r2.cloudflarestorage.com` |
| `S3_ACCESS_KEY_ID` | **Access key** under **Access keys** |
| `S3_SECRET_ACCESS_KEY` | **Secret key** under **Access keys** |
| `S3_PUBLIC_DOMAIN` | Public buckets only: **Public domain** under **Public access**, for example `storefront-media-q8w2e.sevalla.storage` |
 In the sidebar, click **Applications**, then click the application. Click the **Environment variables** tab.
Click **Add environment variables**. Add the variables, keep **Available during runtime** and **Available during buildtime** selected, and click **Add environment variables**.
The build needs the variables too, because `collectstatic` loads the settings. They apply with the next deployment, so add them before you deploy the new settings.
## Install django-storages
Install the package with its S3 extra, which adds boto3, and update `requirements.txt`:
```bash theme={null}
pip install "django-storages[s3]"
pip freeze > requirements.txt
```
## Configure the storage
In `storefront/settings.py`, point the `default` storage at the bucket. Keep the `staticfiles` storage from the deploy guide:
```python storefront/settings.py theme={null}
STORAGES = {
"default": {
"BACKEND": "storages.backends.s3.S3Storage",
"OPTIONS": {
"bucket_name": env("S3_BUCKET"),
"endpoint_url": env("S3_ENDPOINT"),
"access_key": env("S3_ACCESS_KEY_ID"),
"secret_key": env("S3_SECRET_ACCESS_KEY"),
"region_name": "auto",
"signature_version": "s3v4",
# Keep uploads with the same name instead of replacing the older file.
"file_overwrite": False,
},
},
"staticfiles": {"BACKEND": "whitenoise.storage.CompressedManifestStaticFilesStorage"},
}
```
Every `FileField` and `ImageField` now saves to the bucket, and `file.url` returns a link that works for 1 hour (django-storages' default `querystring_expire` is `3600` seconds). See [presigned URLs](/object-storage/connect#share-files-with-presigned-urls).
For a public bucket, return permanent URLs on the bucket's public domain instead. Add the `S3_PUBLIC_DOMAIN` variable to the application, then add two options:
```python storefront/settings.py theme={null}
"custom_domain": env("S3_PUBLIC_DOMAIN"),
"querystring_auth": False,
```
See [public URLs](/object-storage/connect#public-urls).
Commit and push the changes. If **Auto-deploy** is off, click **Deploy now** on the application's **Overview** tab.
## Verify
Click the application's **Web terminal** tab, choose the **Web** process, and save a test file through Django's storage:
```bash theme={null}
. /opt/venv/bin/activate
python manage.py shell -c "from django.core.files.base import ContentFile; from django.core.files.storage import default_storage; name = default_storage.save('hello.txt', ContentFile(b'Hello from Sevalla')); print(default_storage.url(name))"
```
The command prints the file's URL. Open it: the page reads `Hello from Sevalla`. In the sidebar, click **Object storage**, click the bucket, and the **Objects** tab lists `hello.txt`. To remove it, run `default_storage.delete('hello.txt')` the same way, or delete it on the **Objects** tab. See [Manage objects](/object-storage/objects).
## Serve static files from the bucket
WhiteNoise with the [Sevalla CDN](/applications/caching) serves static files well for most projects. To serve them from the bucket instead, make the bucket public and give media and static files their own folders with `location`:
```python storefront/settings.py theme={null}
S3_OPTIONS = {
"bucket_name": env("S3_BUCKET"),
"endpoint_url": env("S3_ENDPOINT"),
"access_key": env("S3_ACCESS_KEY_ID"),
"secret_key": env("S3_SECRET_ACCESS_KEY"),
"region_name": "auto",
"signature_version": "s3v4",
"custom_domain": env("S3_PUBLIC_DOMAIN"),
"querystring_auth": False,
}
STORAGES = {
"default": {
"BACKEND": "storages.backends.s3.S3Storage",
"OPTIONS": {**S3_OPTIONS, "location": "media", "file_overwrite": False},
},
"staticfiles": {
"BACKEND": "storages.backends.s3.S3Storage",
"OPTIONS": {**S3_OPTIONS, "location": "static"},
},
}
```
Then remove `whitenoise.middleware.WhiteNoiseMiddleware` from `MIDDLEWARE`. The build's `collectstatic` now uploads the static files to the bucket, so builds take longer, and every variable must stay **Available during buildtime**. Media files are public too, because public access applies to the whole bucket.
This documentation is built and hosted on [Mintlify](https://mintlify.com), a developer documentation platform.
In the sidebar, click **Applications**, then click the application. Click the **Environment variables** tab.
Click **Add environment variables**. Add the variables, keep **Available during runtime** and **Available during buildtime** selected, and click **Add environment variables**.
The build needs the variables too, because `collectstatic` loads the settings. They apply with the next deployment, so add them before you deploy the new settings.
## Install django-storages
Install the package with its S3 extra, which adds boto3, and update `requirements.txt`:
```bash theme={null}
pip install "django-storages[s3]"
pip freeze > requirements.txt
```
## Configure the storage
In `storefront/settings.py`, point the `default` storage at the bucket. Keep the `staticfiles` storage from the deploy guide:
```python storefront/settings.py theme={null}
STORAGES = {
"default": {
"BACKEND": "storages.backends.s3.S3Storage",
"OPTIONS": {
"bucket_name": env("S3_BUCKET"),
"endpoint_url": env("S3_ENDPOINT"),
"access_key": env("S3_ACCESS_KEY_ID"),
"secret_key": env("S3_SECRET_ACCESS_KEY"),
"region_name": "auto",
"signature_version": "s3v4",
# Keep uploads with the same name instead of replacing the older file.
"file_overwrite": False,
},
},
"staticfiles": {"BACKEND": "whitenoise.storage.CompressedManifestStaticFilesStorage"},
}
```
Every `FileField` and `ImageField` now saves to the bucket, and `file.url` returns a link that works for 1 hour (django-storages' default `querystring_expire` is `3600` seconds). See [presigned URLs](/object-storage/connect#share-files-with-presigned-urls).
For a public bucket, return permanent URLs on the bucket's public domain instead. Add the `S3_PUBLIC_DOMAIN` variable to the application, then add two options:
```python storefront/settings.py theme={null}
"custom_domain": env("S3_PUBLIC_DOMAIN"),
"querystring_auth": False,
```
See [public URLs](/object-storage/connect#public-urls).
Commit and push the changes. If **Auto-deploy** is off, click **Deploy now** on the application's **Overview** tab.
## Verify
Click the application's **Web terminal** tab, choose the **Web** process, and save a test file through Django's storage:
```bash theme={null}
. /opt/venv/bin/activate
python manage.py shell -c "from django.core.files.base import ContentFile; from django.core.files.storage import default_storage; name = default_storage.save('hello.txt', ContentFile(b'Hello from Sevalla')); print(default_storage.url(name))"
```
The command prints the file's URL. Open it: the page reads `Hello from Sevalla`. In the sidebar, click **Object storage**, click the bucket, and the **Objects** tab lists `hello.txt`. To remove it, run `default_storage.delete('hello.txt')` the same way, or delete it on the **Objects** tab. See [Manage objects](/object-storage/objects).
## Serve static files from the bucket
WhiteNoise with the [Sevalla CDN](/applications/caching) serves static files well for most projects. To serve them from the bucket instead, make the bucket public and give media and static files their own folders with `location`:
```python storefront/settings.py theme={null}
S3_OPTIONS = {
"bucket_name": env("S3_BUCKET"),
"endpoint_url": env("S3_ENDPOINT"),
"access_key": env("S3_ACCESS_KEY_ID"),
"secret_key": env("S3_SECRET_ACCESS_KEY"),
"region_name": "auto",
"signature_version": "s3v4",
"custom_domain": env("S3_PUBLIC_DOMAIN"),
"querystring_auth": False,
}
STORAGES = {
"default": {
"BACKEND": "storages.backends.s3.S3Storage",
"OPTIONS": {**S3_OPTIONS, "location": "media", "file_overwrite": False},
},
"staticfiles": {
"BACKEND": "storages.backends.s3.S3Storage",
"OPTIONS": {**S3_OPTIONS, "location": "static"},
},
}
```
Then remove `whitenoise.middleware.WhiteNoiseMiddleware` from `MIDDLEWARE`. The build's `collectstatic` now uploads the static files to the bucket, so builds take longer, and every variable must stay **Available during buildtime**. Media files are public too, because public access applies to the whole bucket.
This documentation is built and hosted on [Mintlify](https://mintlify.com), a developer documentation platform.