Newly created static sites use the sevalla.page temporary domain. As Sevalla is a Kinsta product, we previously used kinsta.page temporary domains for static sites. This is a normal part of the Sevalla experience. Your static site will still be accessible and manageable through Sevalla’s interface even if it uses the kinsta.page domain.
Add domain
In Sevalla, go to Static sites > sitename > Domains. Click Add custom domain and enter your domain name. If you want to cover all subdomains, select Wildcard and then click Add custom domain.If you add your domain without the wildcard subdomain, you should also consider adding the www version of the domain without the wildcard to ensure both versions are correctly configured.

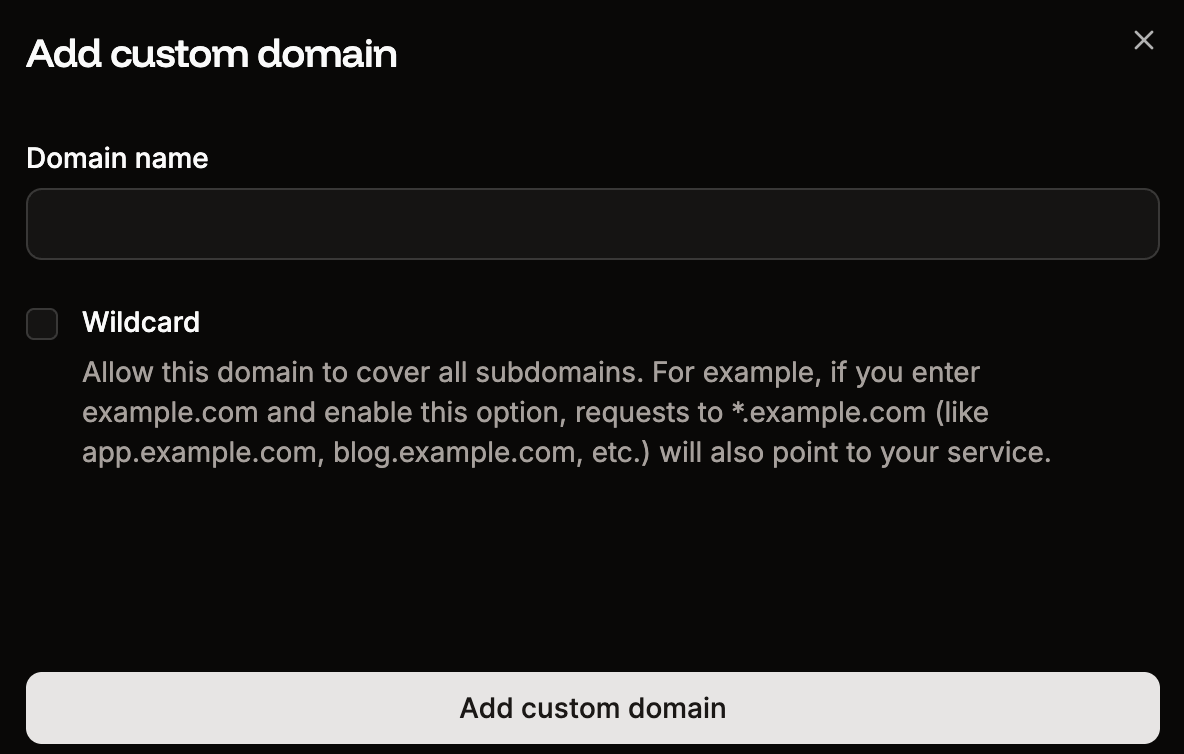
Add your custom domain to your application in Sevalla.
Verify domain
To verify your domain, you need to add the records shown to your domain’s DNS records: an ownership TXT record, plus an SSL validation record whose type depends on your domain. Some DNS providers, such as Namecheap, Spaceship, and Squarespace need the short version of DNS record names. Sevalla automatically provides both the full and short versions of each record, so you can use whichever format your DNS provider needs.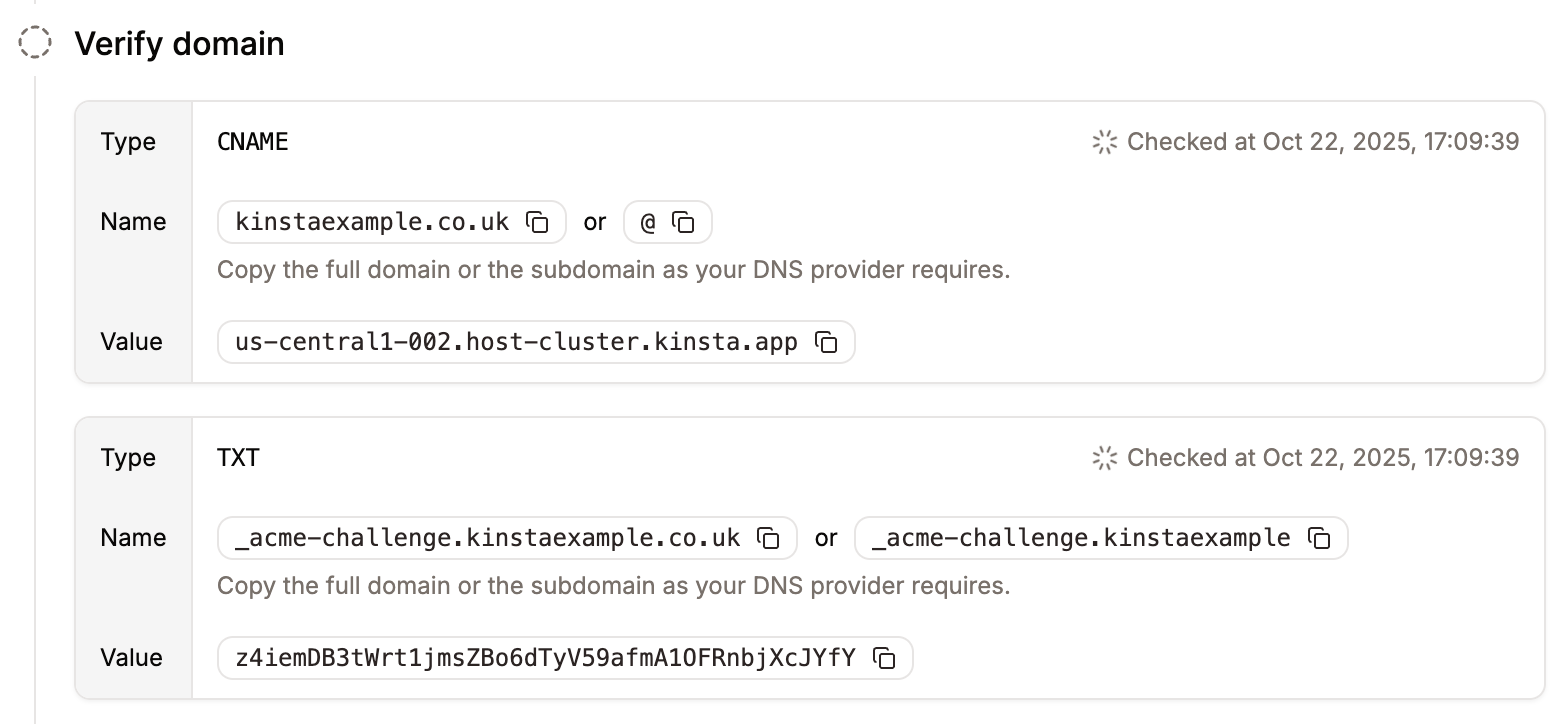
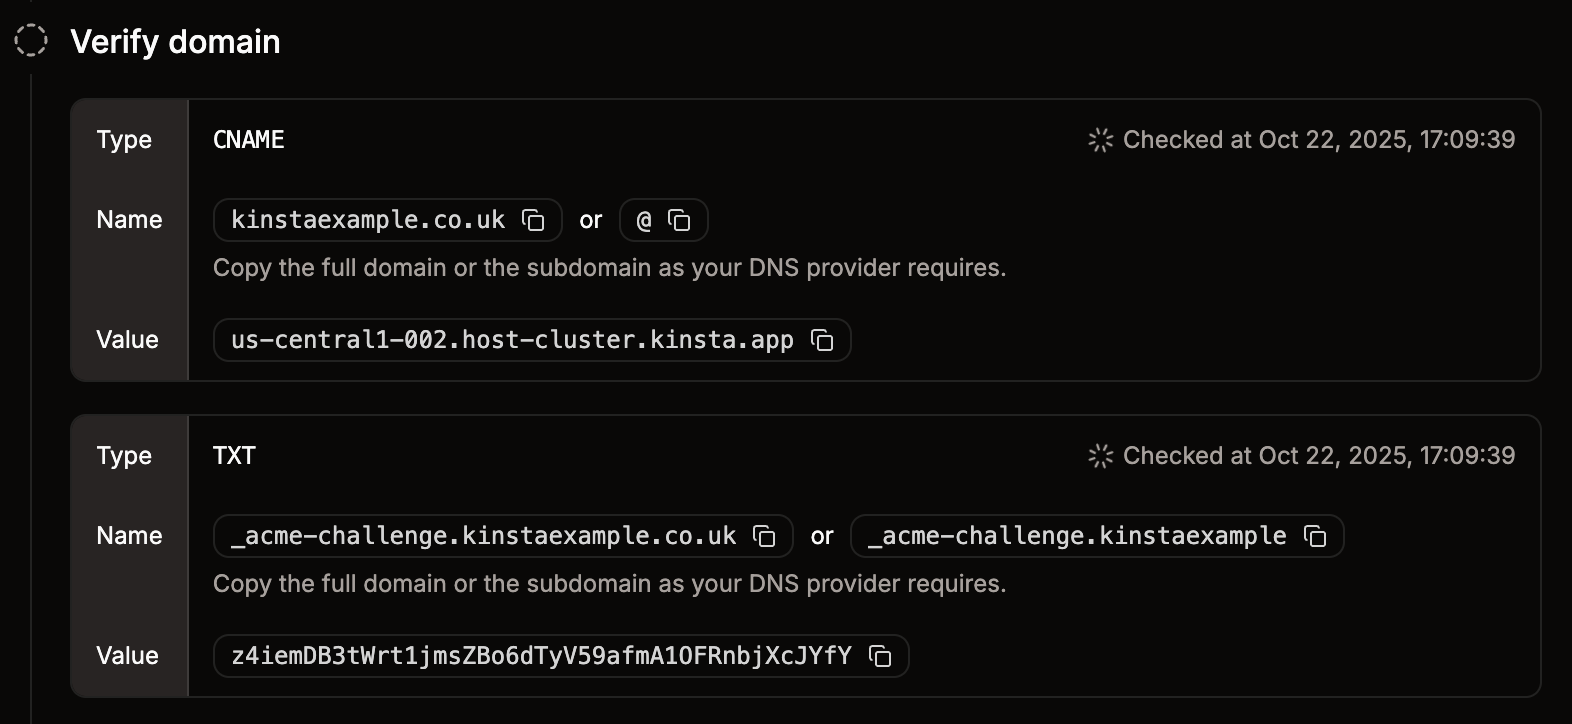
Add the verification records to your DNS records to verify your domain.
- Type:
TXT - Name:
_cf-custom-hostname - Value: Unique UUID value from Sevalla (xxxxxxxx-xxxx-xxxx-xxxx-xxxxxxxxxxxx)
_acme-challenge)
Sevalla uses this DNS entry to issue and renew your SSL certificate. As long as this record exists in your DNS, you won’t need to manually renew your SSL certificate; Sevalla manages it for you. We don’t recommend removing this DNS entry, as you will need to re-add it each time the SSL certificate requires renewal.
The record type depends on whether your domain is a wildcard. Add it exactly as Sevalla shows it:
- Standard (non-wildcard) domains - add a TXT record:
- Type:
TXT - Name:
_acme-challenge - Value: the validation token shown in Sevalla
- Type:
- Wildcard domains - add a CNAME record:
- Type:
CNAME - Name:
_acme-challenge - Value:
example.com.[unique verification token].dcv.cloudflare.com
- Type:
Point domain
Once your domain is successfully verified, you can point it by adding the required A records to your domain’s DNS settings. Some DNS providers, such as Namecheap, Spaceship, and Squarespace, need the short version of DNS record names. Sevalla automatically provides both the full and short versions of each record, so you can use whichever format your DNS provider needs. If you select the Wildcard option, an additional A record for*.yourdomain.com appears to add to your domain’s DNS settings, which ensures all subdomains are covered.
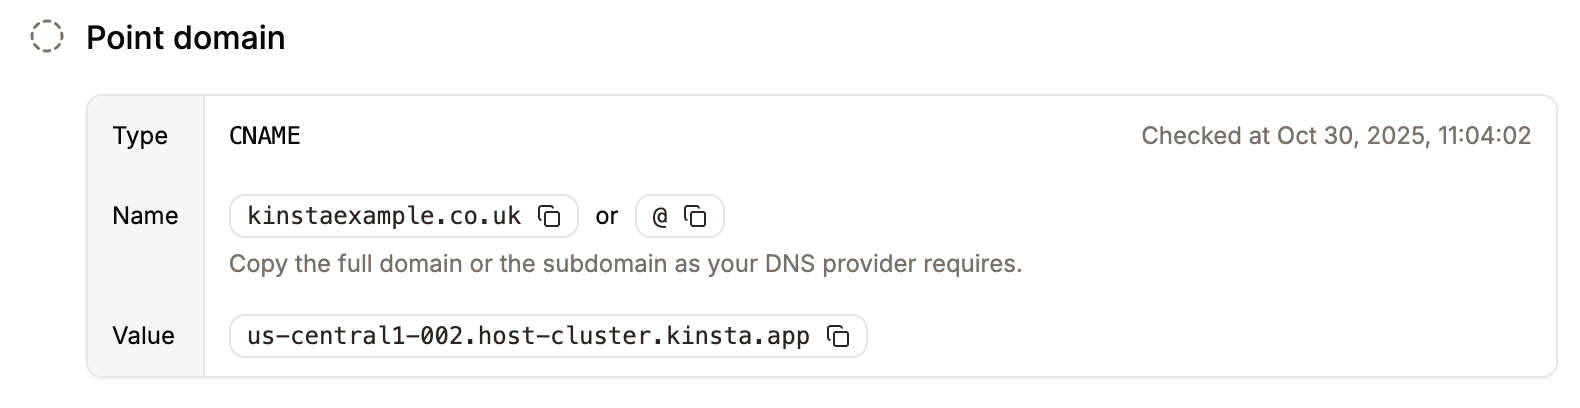
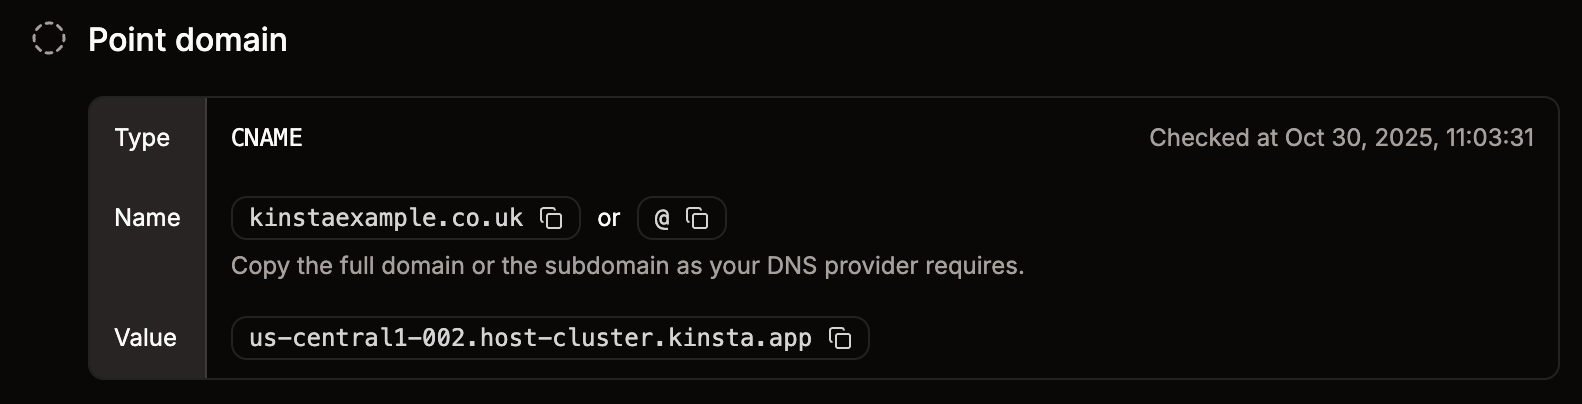
Point your application domain.
Point WWW domain
We recommend that you point the www version of your domain to Sevalla (if you haven’t already). To do so, add the www version of the domain to Sevalla and repeat the steps to verify and point the subdomain.Proxying through your own Cloudflare (Orange-to-Orange)
Sevalla’s infrastructure already runs behind Cloudflare. If your DNS is also on Cloudflare and you enable the proxy (orange cloud) on the records that point to Sevalla, your traffic passes through two Cloudflare zones - your own and Sevalla’s. This is known as an Orange-to-Orange (O2O) setup, and it comes with trade-offs:- SSL certificate renewal problems: Sevalla issues and renews your SSL certificate through the
_acme-challengerecord. When your zone proxies the domain, renewal validation can fail, which can leave your domain with an expired certificate. Always keep the verification records (_cf-custom-hostnameand_acme-challenge) set to DNS only (grey cloud). - Caching issues: Your Cloudflare zone caches content in front of Sevalla’s edge network, which already serves your static site from 260+ locations. Purging or redeploying in Sevalla does not purge your own zone’s cache, so visitors can be served stale content, and conflicting cache rules between the two layers can cause unexpected behavior.
Change your primary domain
In the domains list, locate the domain you want to be the primary domain, click the kebab (three-dot) menu, and click Make primary domain. Verify that the correct domain is selected, then click Continue.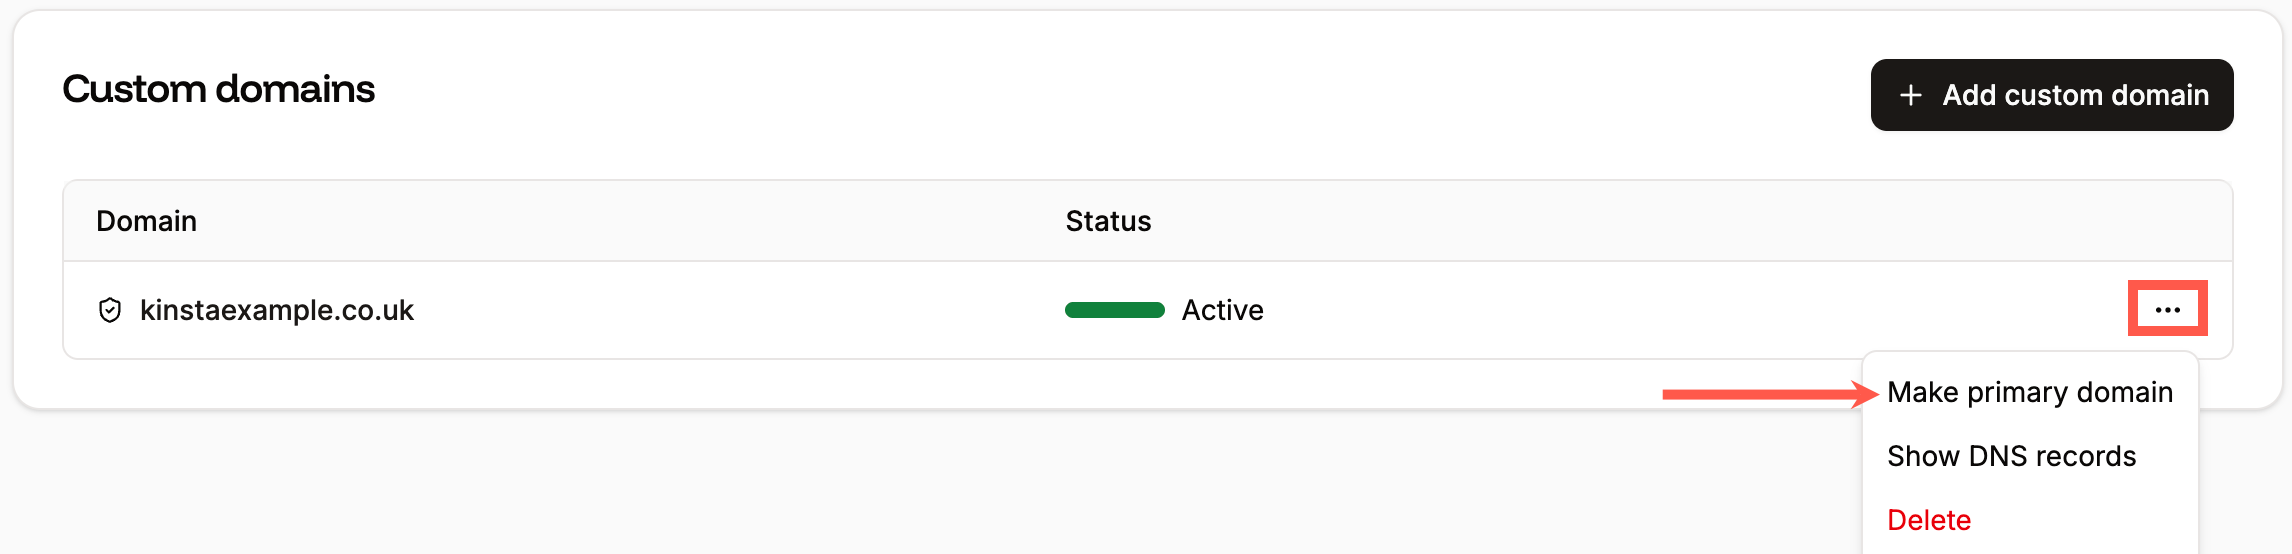
Change your primary domain.
IP address
The IP address is shown when you point your domain. We use Cloudflare to secure our hosting infrastructure, so the corresponding IP you see for your application is a Cloudflare IP address. This means the owner of the IP address is Cloudflare, Inc., located in the United States of America. The IP address doesn’t reflect the physical place where your application is hosted, nor does it add any further latency to your application. Your application files are stored in the data center location you choose. We do not create copies of your application and store those copies elsewhere. We do not offer dedicated IP addresses because they aren’t necessary for most configurations. Since our infrastructure is secured by Cloudflare, sites, applications, and databases hosted on Sevalla use a range of shared IP addresses provided by Cloudflare. Our Cloudflare IP addresses are reserved for Sevalla customers only, so you won’t share an IP address with spam or adult sites or applications hosted elsewhere.Troubleshoot domain issues
Most domain problems happen during verification or pointing, and they usually come down to a conflicting or mis-entered DNS record. Work through the checks below in order.Domain won’t verify
If your domain stays unverified after you’ve added the records Sevalla shows, check the following:- Remove any existing A or CNAME record on the root domain. If your domain already has an A or CNAME record (for example, pointing to a previous host), Cloudflare tries to verify ownership through that record, and verification fails. Remove the old A or CNAME record before verifying, then add the records Sevalla provides.
- Confirm the
_acme-challengerecord uses the correct type. The required type depends on whether the domain is a wildcard. For a standard (non-wildcard) domain, add_acme-challengeas a TXT record. For a wildcard domain, add it as a CNAME record (its value ends indcv.cloudflare.com). Always match the exact record type Sevalla shows - using the wrong type prevents the SSL certificate from being issued. - Disable the Cloudflare proxy on the verification records. If you use Cloudflare as your DNS provider, set the verification records to DNS only (grey cloud). Proxied (orange cloud) records don’t resolve publicly, so verification can’t complete. You can re-enable the proxy on your A or CNAME records after the domain is active.
- Remove conflicting or stale records. If you previously added and removed this domain in Sevalla, an old
_cf-custom-hostnameTXT value may still be in your DNS. Delete any outdated_cf-custom-hostnameor_acme-challengerecords and re-add the exact values shown in Sevalla. - Confirm the value matches exactly. Copy the value directly from Sevalla. A trailing space, a missing character, or a wrong record name causes verification to fail.
- Check the Time-to-Live (TTL) setting. This controls how long internet providers and other services remember your DNS settings before checking for updates. It is usually set to Auto or 5 minutes, but if it has been changed to a longer period, DNS propagation can take longer to take effect.
SSL certificate isn’t issued
Sevalla issues and renews your SSL certificate automatically once the domain is verified. If the certificate stays pending:- Keep the
_acme-challengerecord in place (a TXT record for standard domains, or a CNAME record for wildcard domains). Removing it stops Sevalla from renewing your certificate, and you would need to re-add it. - Check for a CAA record conflict, described in Fix domain error below.
Fix domain error (CAA record conflict)
During the domain verification process, if a Fix domain error button appears next to the domain, this means a CAA record conflict is occurring. A CAA record is an optional DNS record that lets you specify which certificate authorities (CAs) are allowed to issue SSL certificates for your domain. If a domain has no CAA records, any CA can generate an SSL certificate for it if requested. If a domain has a CAA record, only the CA(s) specified in the CA record can generate an SSL certificate for the domain. To resolve this error, click the Fix domain error button and update the CAA record as indicated in the modal/pop-up. Alternatively, if you do not need a CAA record on your domain, you can remove the CAA record.Domain verified, but the site doesn’t load
If the domain verifies but doesn’t serve your site:- Confirm the A record (or CNAME) matches the exact value shown on the Point domain step in Sevalla. If you reused an old record, update it.
- If you use the Cloudflare proxy, make sure it’s enabled only on the A or CNAME records that point to Sevalla, not on the verification records.
- For wildcard domains, confirm you also added the
*.yourdomain.comA record.